The assignment
This a group work that I did together with Linn Flodin, Felicia Törner and Ahamad Soheyl Matin. Today, there are many people who do not have the time or energy to take care of their plants at home. Today there are several self-watering systems where the plant always has access to water, for example hydroponic and capillary systems. The disadvantage of these systems is that they do not take into account how often the plant should be watered. Therefore, this project has focused on developing a self-watering system that is adapted to the needs of the plant.
The project has consisted of four phases, all of which focus on different parts of the design process. The first phase is the preliminary study, the second is the idea and concept phase, the third phase is about production and the last is about detailed design.
1 Pilot study
The first phase was the feasibility study where the goal was to find a target group, critical functions and finally summarize everything in a mission statement. The phase included research in the form of benchmarking, interviews, surveys and analysis of needs. To read more about the full feasibility study click on the link.
Interview and survey
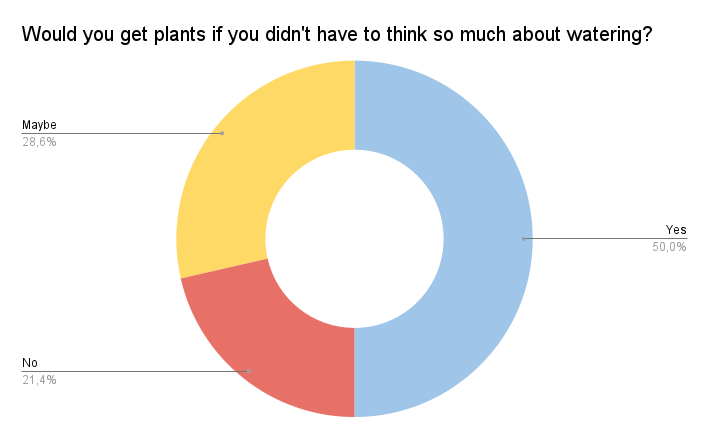
During this phase, the target group was chosen to be people with too little time and energy to take care of their plants. We conducted an interview with a florist at Blomsterlandet in Luleå, where he explained how the different systems worked and what he thought were the disadvantages of today's system. With that information, we made a survey and got 77 responses to it where our target group got to express their expectations and needs among other things. resulted in the choice of target group. One important thing we took away from the survey is that 50% of respondents who don't have plants would get plants if they didn't have to worry about watering.
Benchmarking
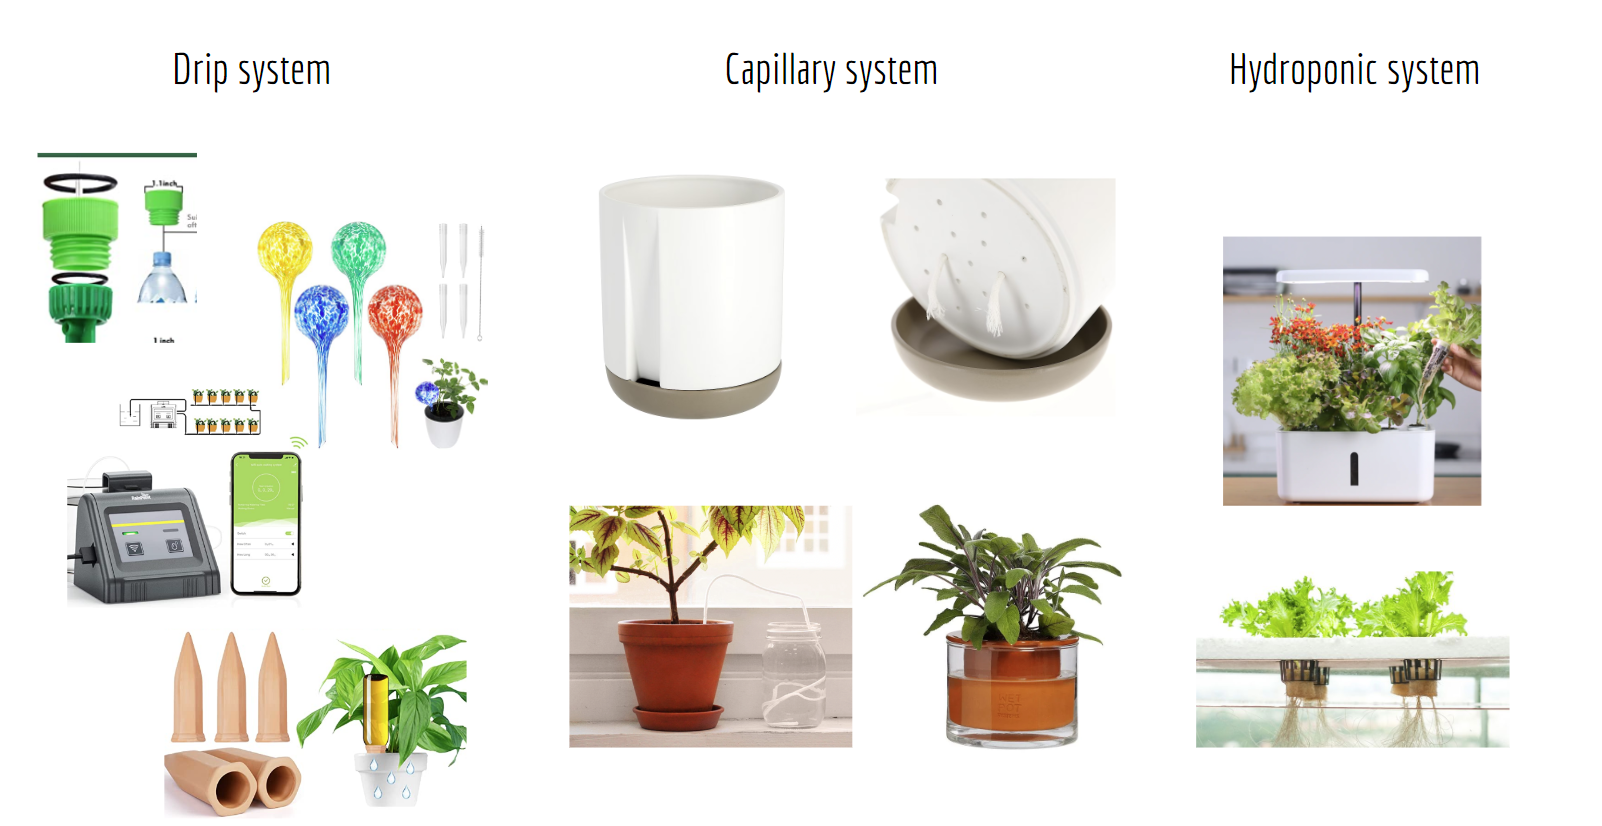
To get an even deeper understanding of today's system, we did an online benchmarking where we examined price ranges, time span between waterings, materials and general pros and cons. The cheapest drip systems involve putting a water container in the soil and it drips until the water runs out. These systems are also available automatically and then the price runs away very quickly. the capillary systems often use some form of string that bridges the water and keeps the soil constantly wet. In hydroponic systems, the plant is planted in nutrient-rich water and here, too, has constant access to water.
The problem with today's self-watering systems is that they are not adaptable to the plants' needs. Today's system provides the plants with constant access to water until the water tank is empty. This means that the systems only work for plants that do well in constantly moist soil.
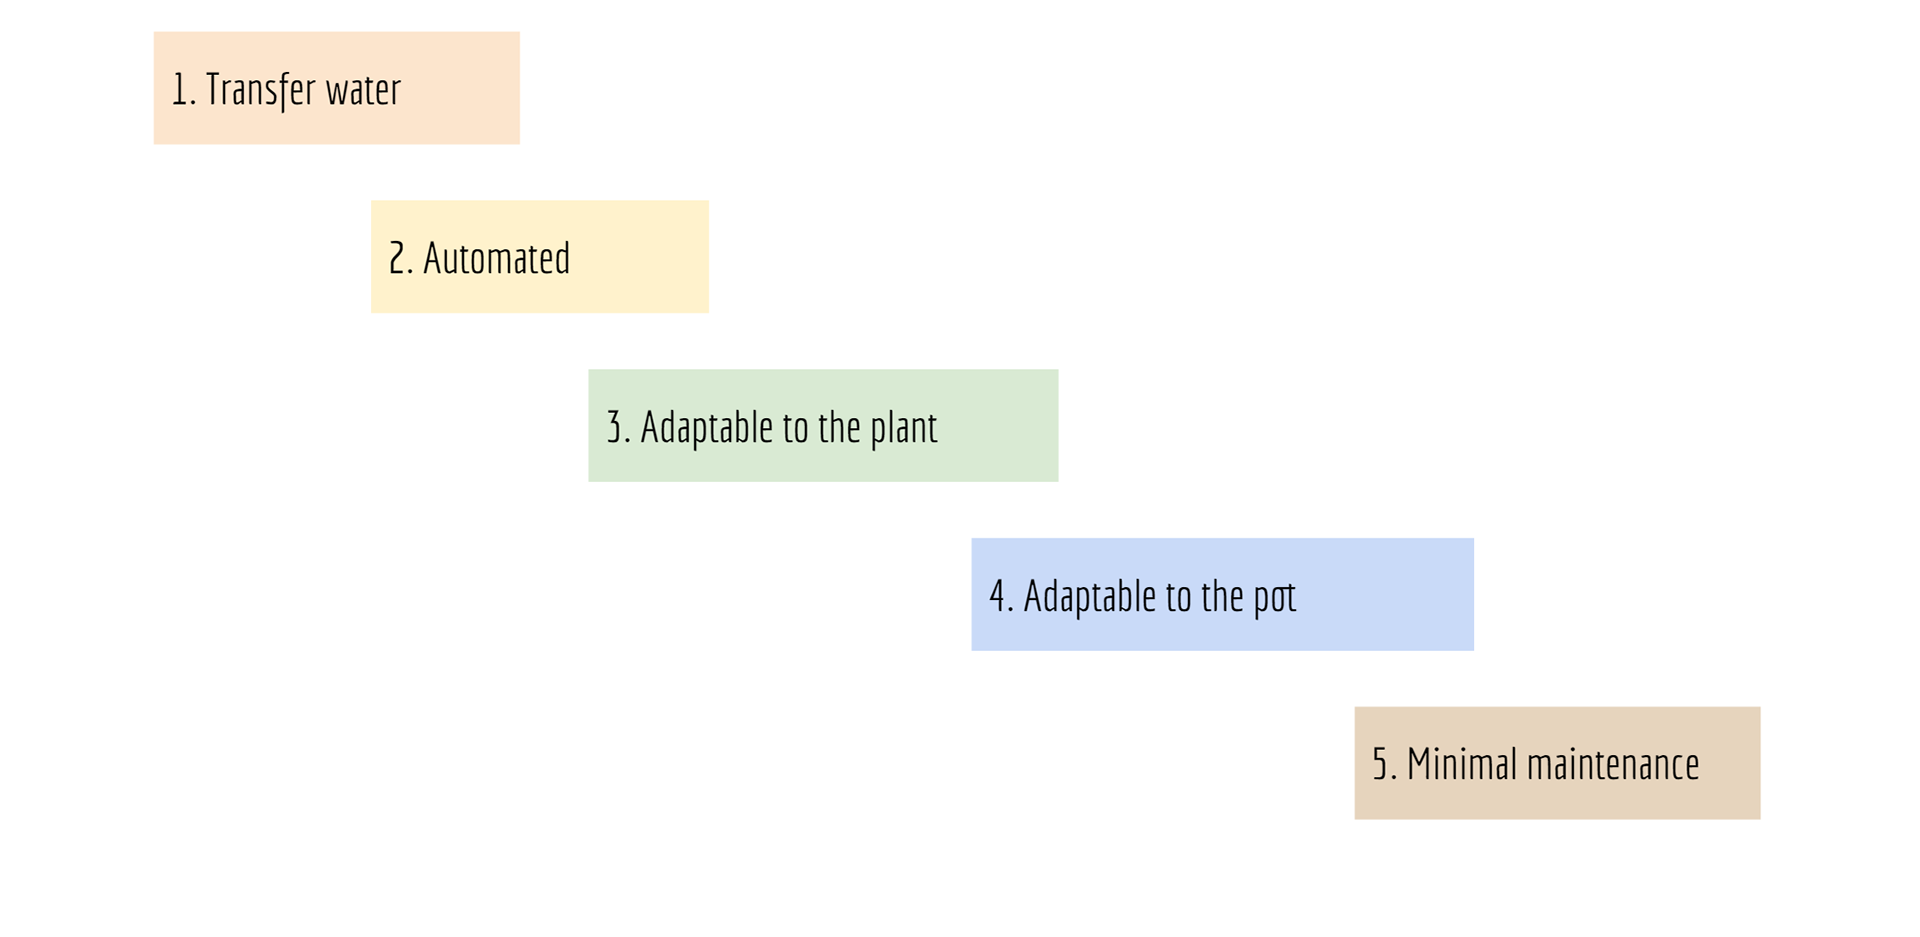
Critical functions
With the help of benchmarking, the interview with the florist and all the survey responses, five critical functions were identified that we felt our self-watering system would fulfill. Some features will change and some will be removed.
Mission statement
Together with the target group and critical functions, a mission statement was developed, which will be changed during the course of the project.

2 Idea and concepts
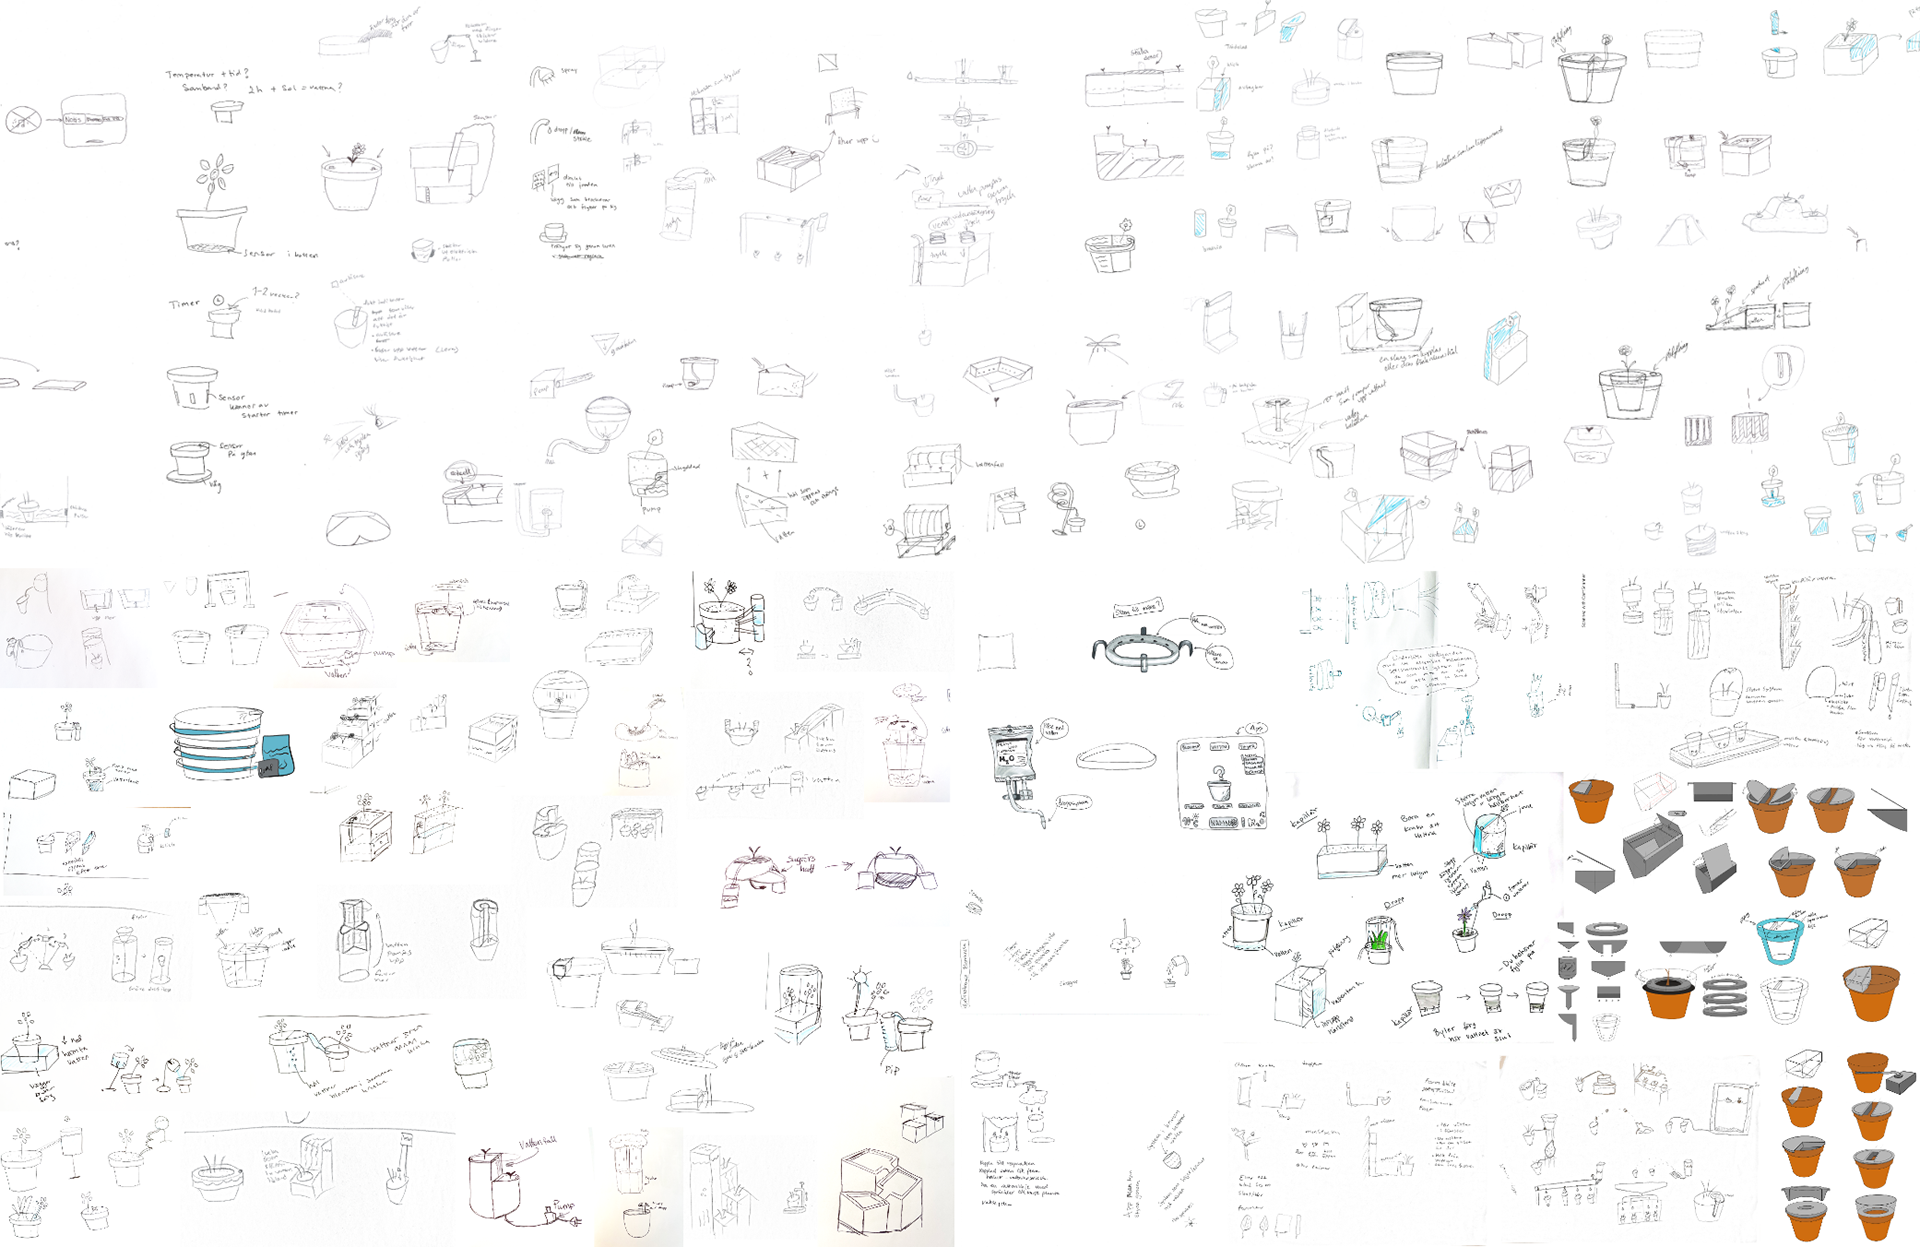
The second phase was the idea and concept phase, which mostly consisted of idea-generating methods such as brainstorming and braindrawing. The goal of this phase was to use the developed critical functions to find solutions and form individual concepts that fulfill these. The idea and concept phase resulted in four different concepts that were all focused on different details. One concept was selected and further developed using the benefits from the others. To see exactly how we carried out this phase check the link.
Sketches
We made a lot of sketches during this phase, which we then took inspiration from when developing our own concepts.
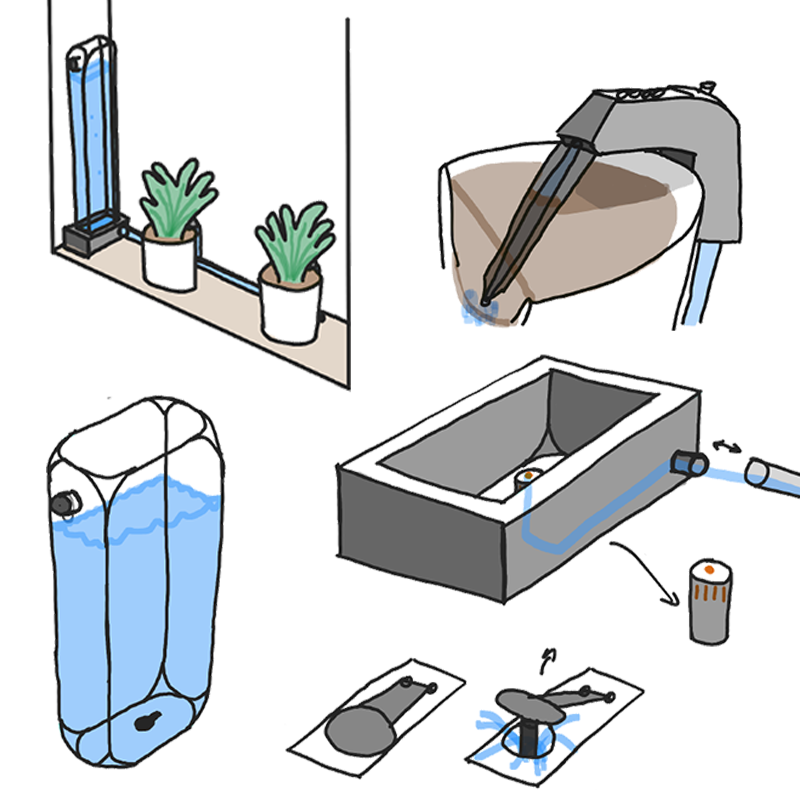
My concept
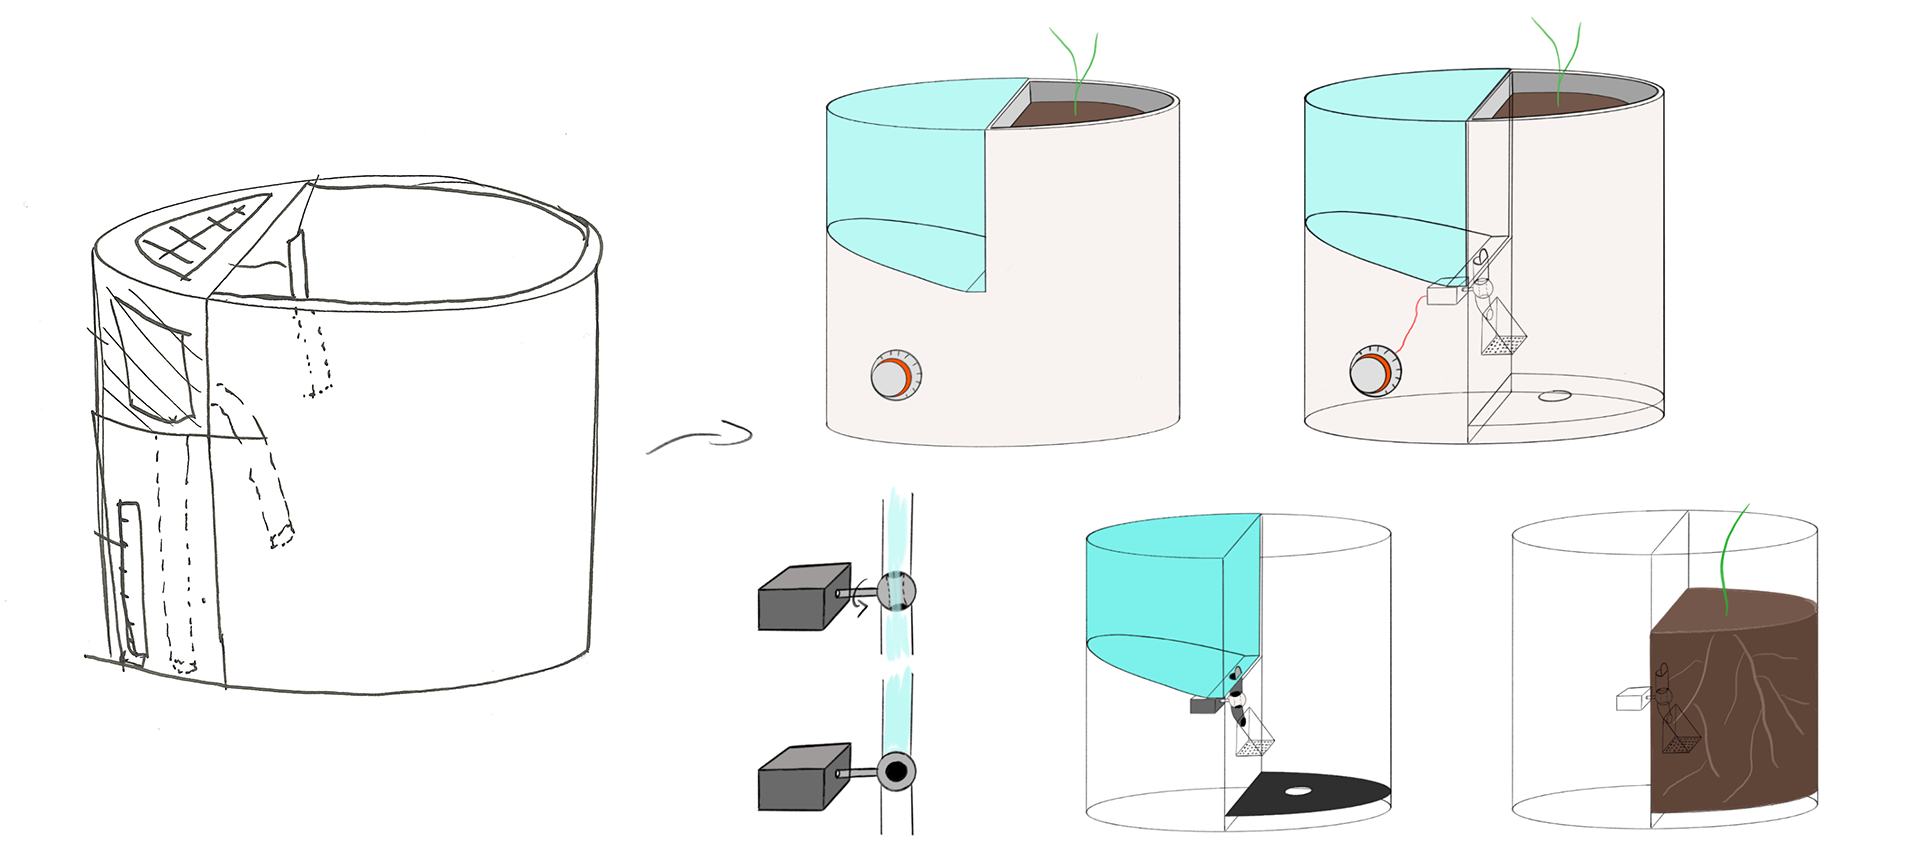
My concept has an advanced sensor that is placed in the soil, it senses the dryness of the soil and waters based on settings. The sensor is connected to a water pipe that goes to a dock that is connected to a removable water tank. The water tank has a valve that is opened with a stick that takes in water. The idea is that you should be able to connect the system to several pots and that the tank should be very large but hidden on the edge of the window.
My concept
Other concepts
The first concept is a large water tank that uses a pump to transfer the water to the three plants that the system accommodates.
The second concept also uses a pump to transfer water but also has a sensor that measures the dryness and a solar cell to power the pump.
The third concept is a plate with a stick on which you place a pot with a hole. In the plate there is a water tank that pushes up water.
Linn
Felicia
Soheyl
Selected concept and developing
Using a requirements weighting matrix and feedback from both supervisors and users, the second concept was chosen. We took the best from all the concepts and developed a new final concept that uses gravity and a valve to transfer the water. The water tank is removable to facilitate watering and the plant is planted directly in the pot.
Deeper benchmarking
After the last phase, some information was missing about how often plants need to be watered. To get a better picture of how many plant species need continuous watering, respectively watering with larger intervals, I made a script that searched the plantation's website for all plant types. The script analyzed approximately 1,500 plants' data that was available and from that we got data on, among other things, how much water the plants need, what location they need and whether they are difficult or easy to care for. Using this information, the amount of water a plant needs per watering could be generalized and used in the final concept.

3 Production design
Phase three was the production phase and the period of my responsibility. It included, among other things, choice of manufacturing method, choice of materials and product calculation. Adaptations of the pot were made to facilitate production and to ensure that the mechanism with, among other things, water transfer would work. On the link you can see in more detail what we did.
Case company
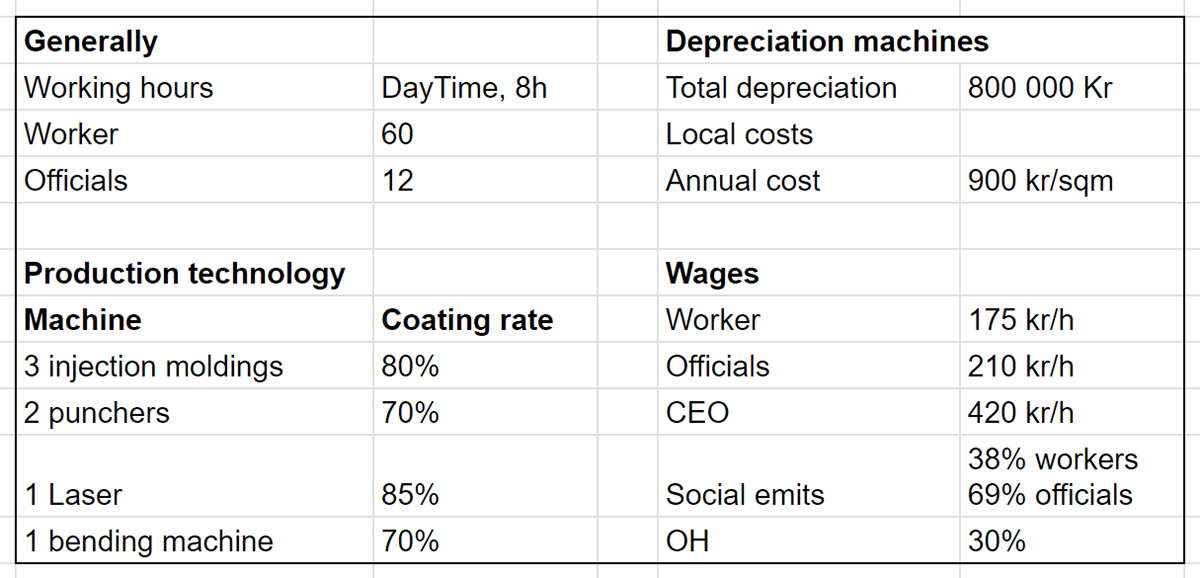
In order to plan a layout and calculation, the group was assigned a company called Lilla AB. The table below shows some information about the company and its form on premises. Lilla AB currently manufactures only one product and is owned by a large foreign company. The company's goal is to be able to reach a large target group on the global market by offering innovative products at an affordable price.
Lilla AB is faced with tough demands "from above" concerning, among other things, the profit margin and the packaging of the goods. The packaging's high requirements exist because the products first go to the parent company's large central warehouse before reaching the customers. A reviewer recently criticized the existing product's packaging.
Material selection and manufacturing method
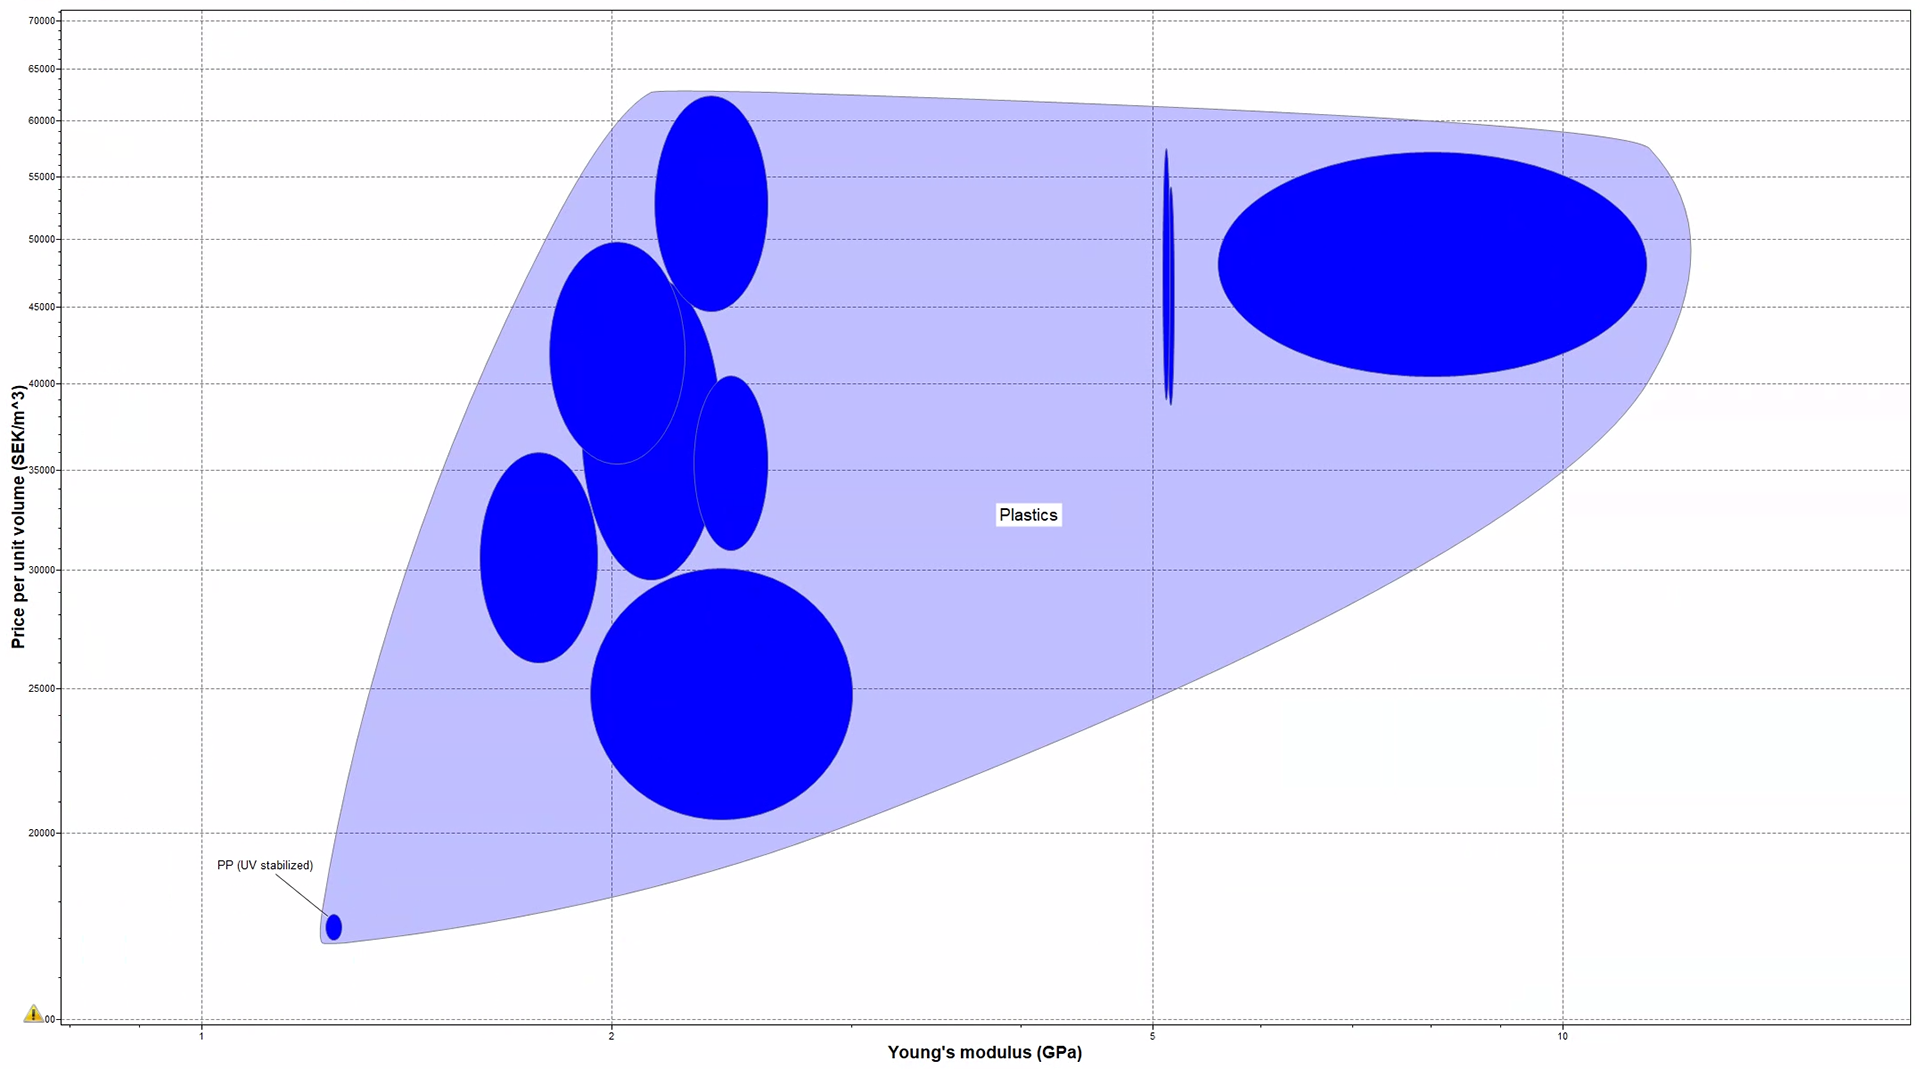
With the help of CES Edupack, we put several restrictions on the material. The most important constraints were that the material would be able to be injection molded because the company already had injection molding machines and that the price of the material would be as cheap as possible. What remained were several plastics as shown in the picture and we chose Polypropylene (PP) because that material has the properties we are looking for.
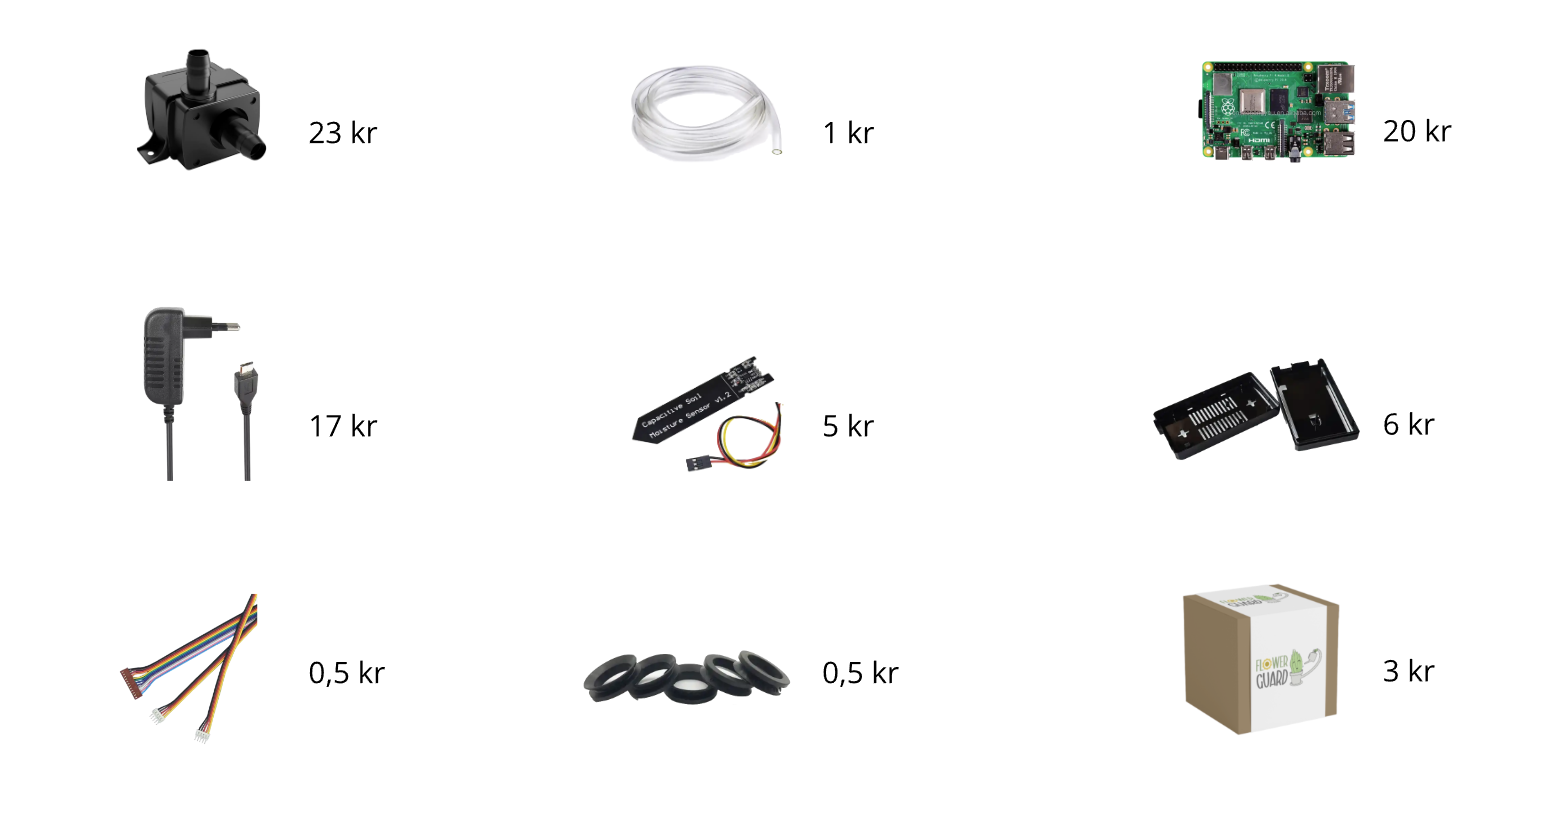
Purchased parts
With a selected material and a planned concept, we did a market survey to find the price for all the parts that would also be included in the self-watering system. It was quite difficult to estimate prices considering that we needed to add shipping costs and look for a price for the injection molding tool.
CAD model
During this phase, we were not completely done with our concept, so me and Soheyl had to spend a lot of time in Siemens NX to produce digital prototypes and show the others in the group and thus arrive at a joint decision. In the model below we had removed the removable water tank to get even more water volume, a small space for the pump had also been added but what was not finished was the placement of the hoses.
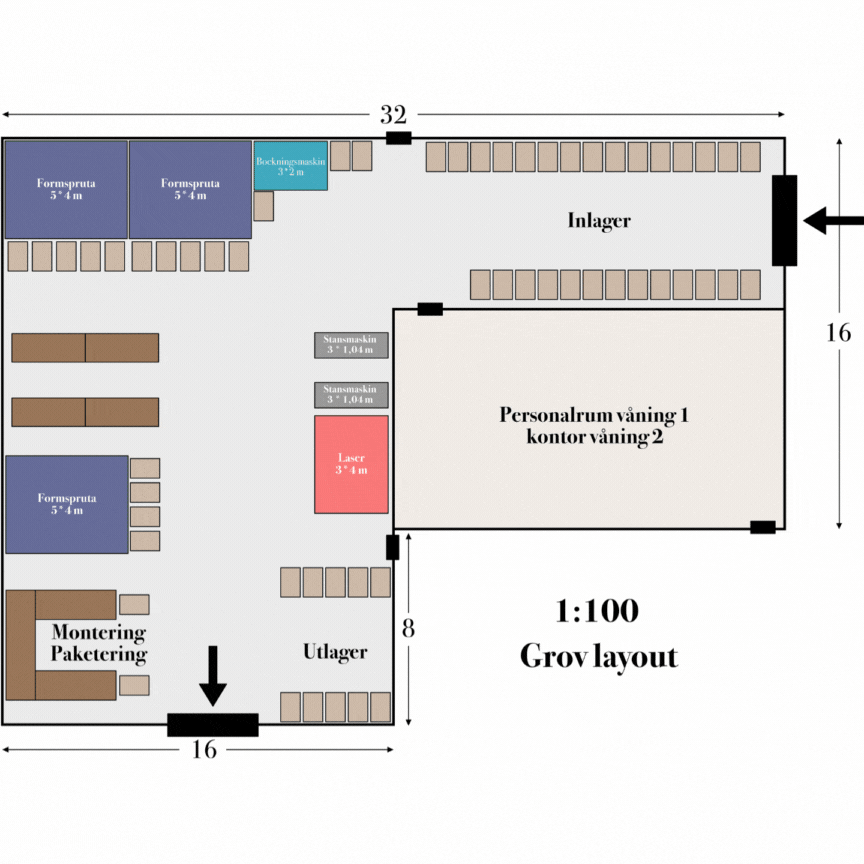
Factory layout and flow
Our layout is shown in the gif below which shows the manufacturing process of the pot and how it is fashioned. We have placed the machines and the warehouses so that everything can fit and be produced smoothly. First, plastic material is loaded and driven to the injection molding machine where the pot and lid are injection molded then it is sent on to assembly and inspection so the pot is not defective and then placed in an intermediate warehouse. At the same time, the electronic parts are collected and shipped to the assembly station where all the electrical parts are checked for functionality. After that, the electrical system is assembled with the pot together with seals and packaged, the package is then sent to a final warehouse.
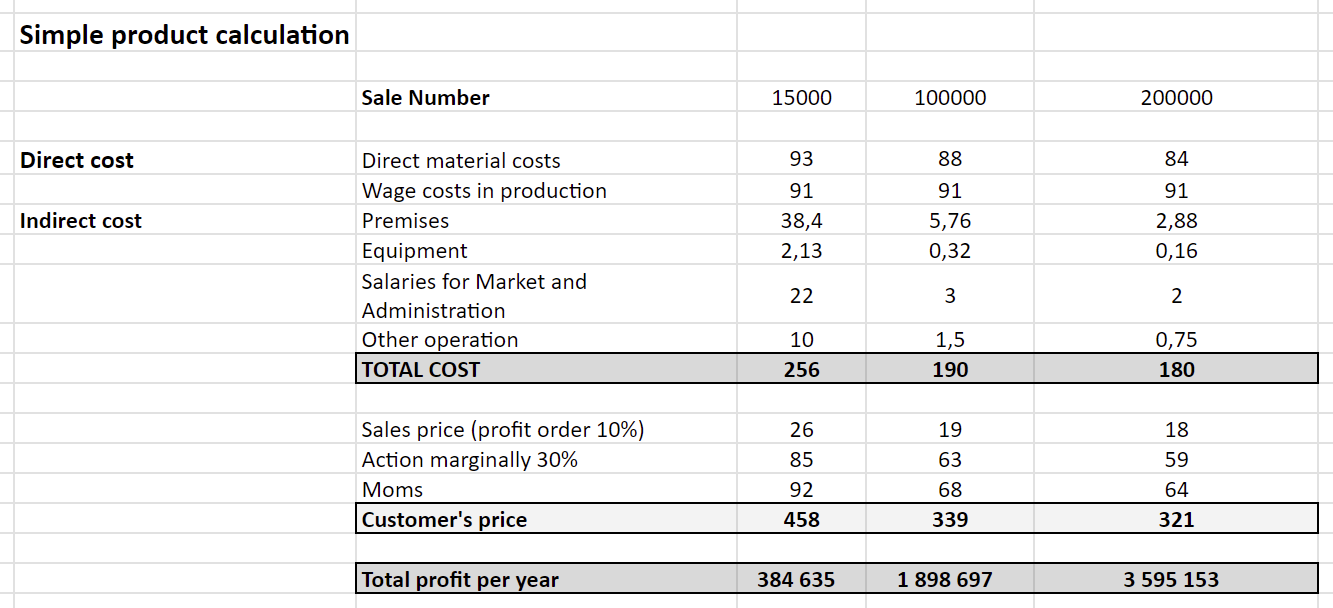
Product calculation
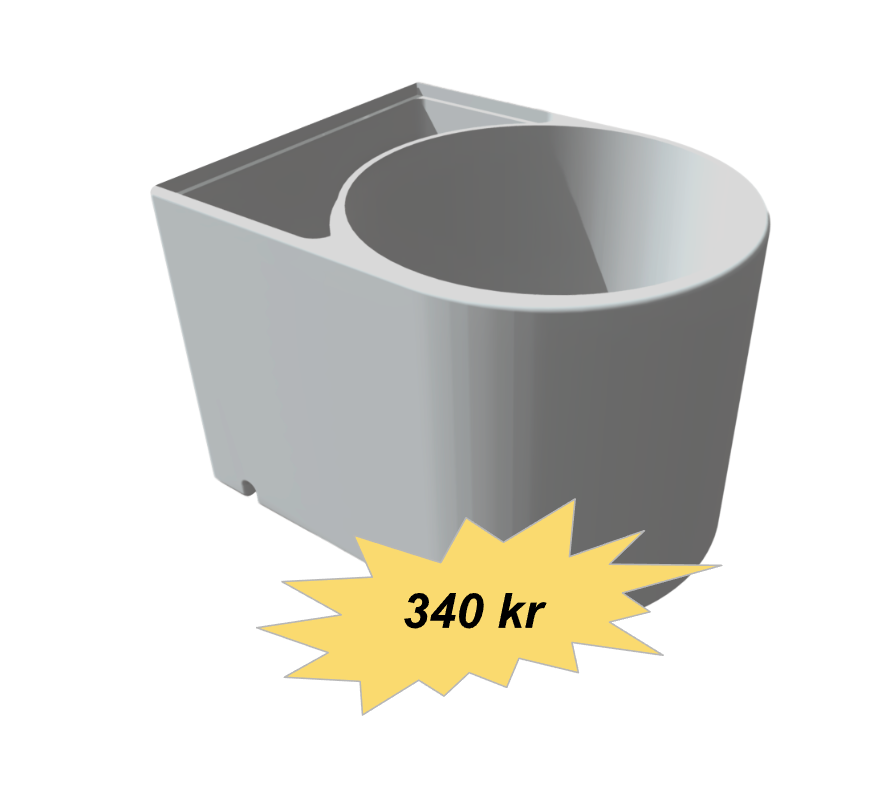
When we managed to produce costs for, among other things, all materials, how long the production time is and the size of the factory, we could start with a product calculation. It resulted in the customer having to pay SEK 340 for a very good self-watering system.
4 Detailed design
The fourth phase was the detailed design phase. This phase was about refining the concept and solving the question marks that remained from the previous phases. Among other things, completing the Cad model that would be the basis for the prototype. For the model, there were, among other things, many measurements and small details that needed to be adjusted. A prototype was made in a foam material to give a feel for the size and to see if a potted plant would really fit.
New CAD model
The previous cad model was redone so that all measurements were correct and the placement of the hose had been solved by making a hole that goes straight through the pot in a slightly thicker part between the pot and the tank. A smaller pump was also found during this phase to give the water tank a bit more volume and thus reduce the number of refills. Below is a simple 3D model of the final pot.
Prototype
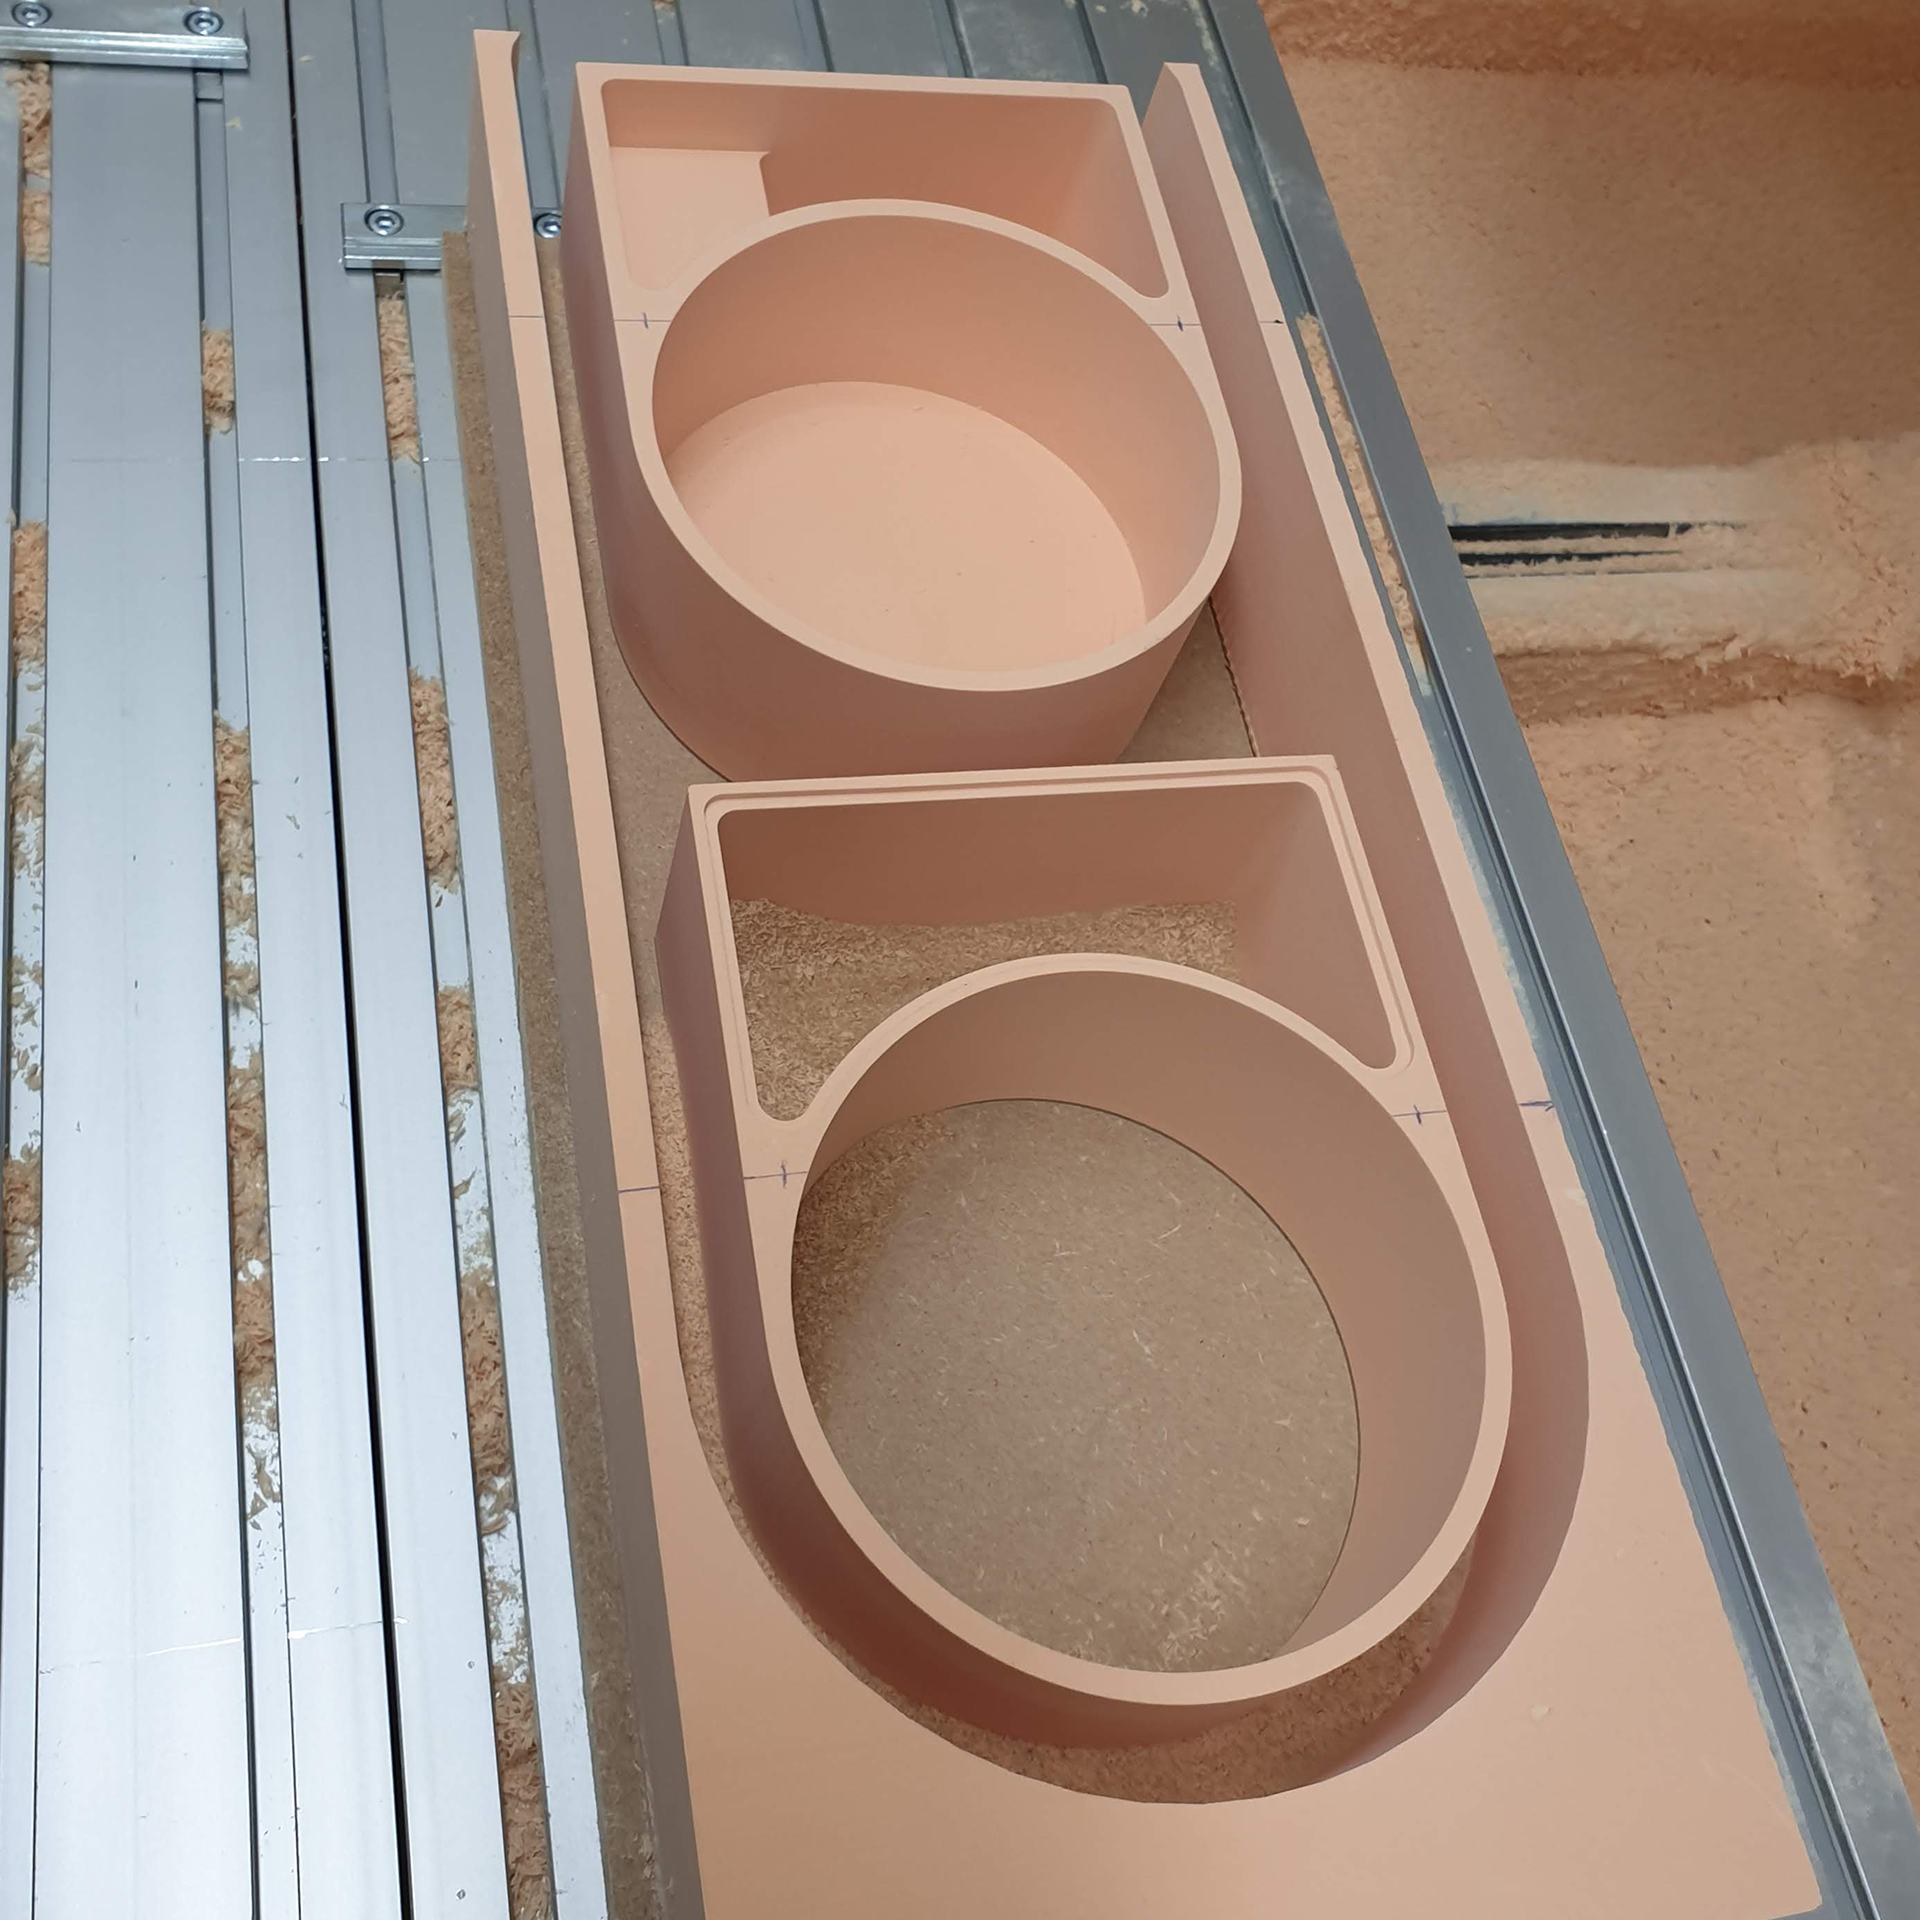
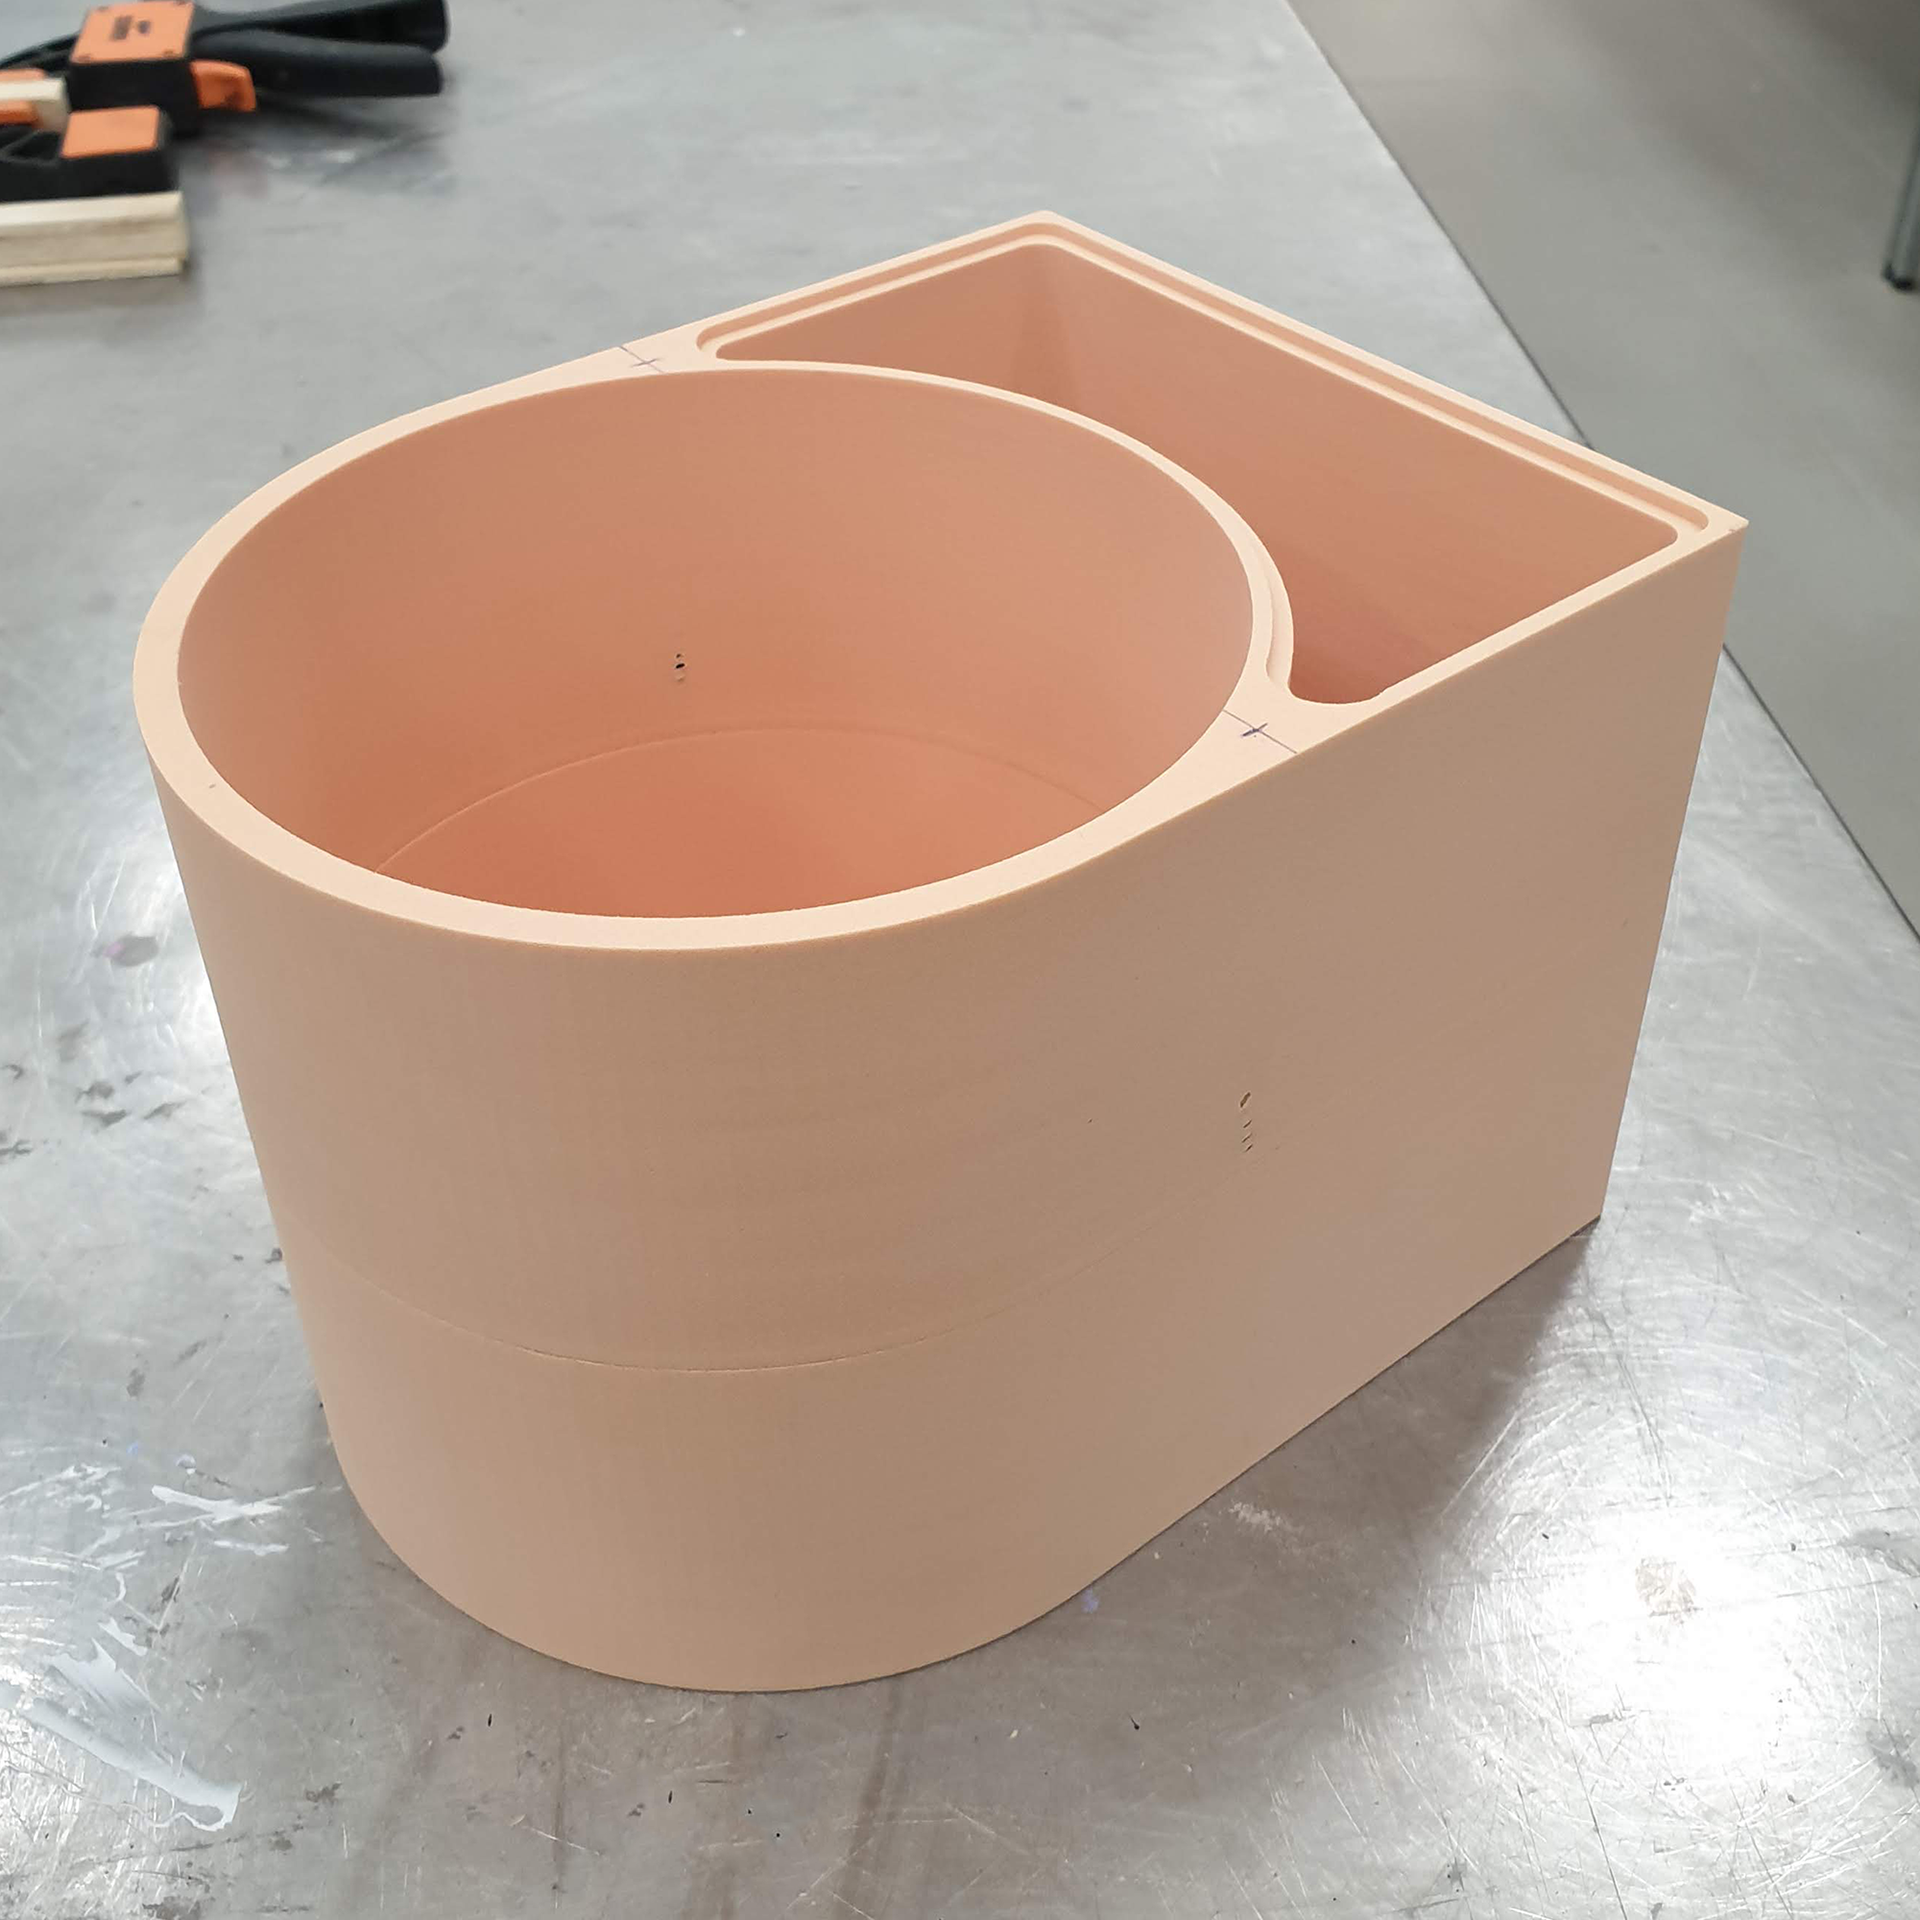
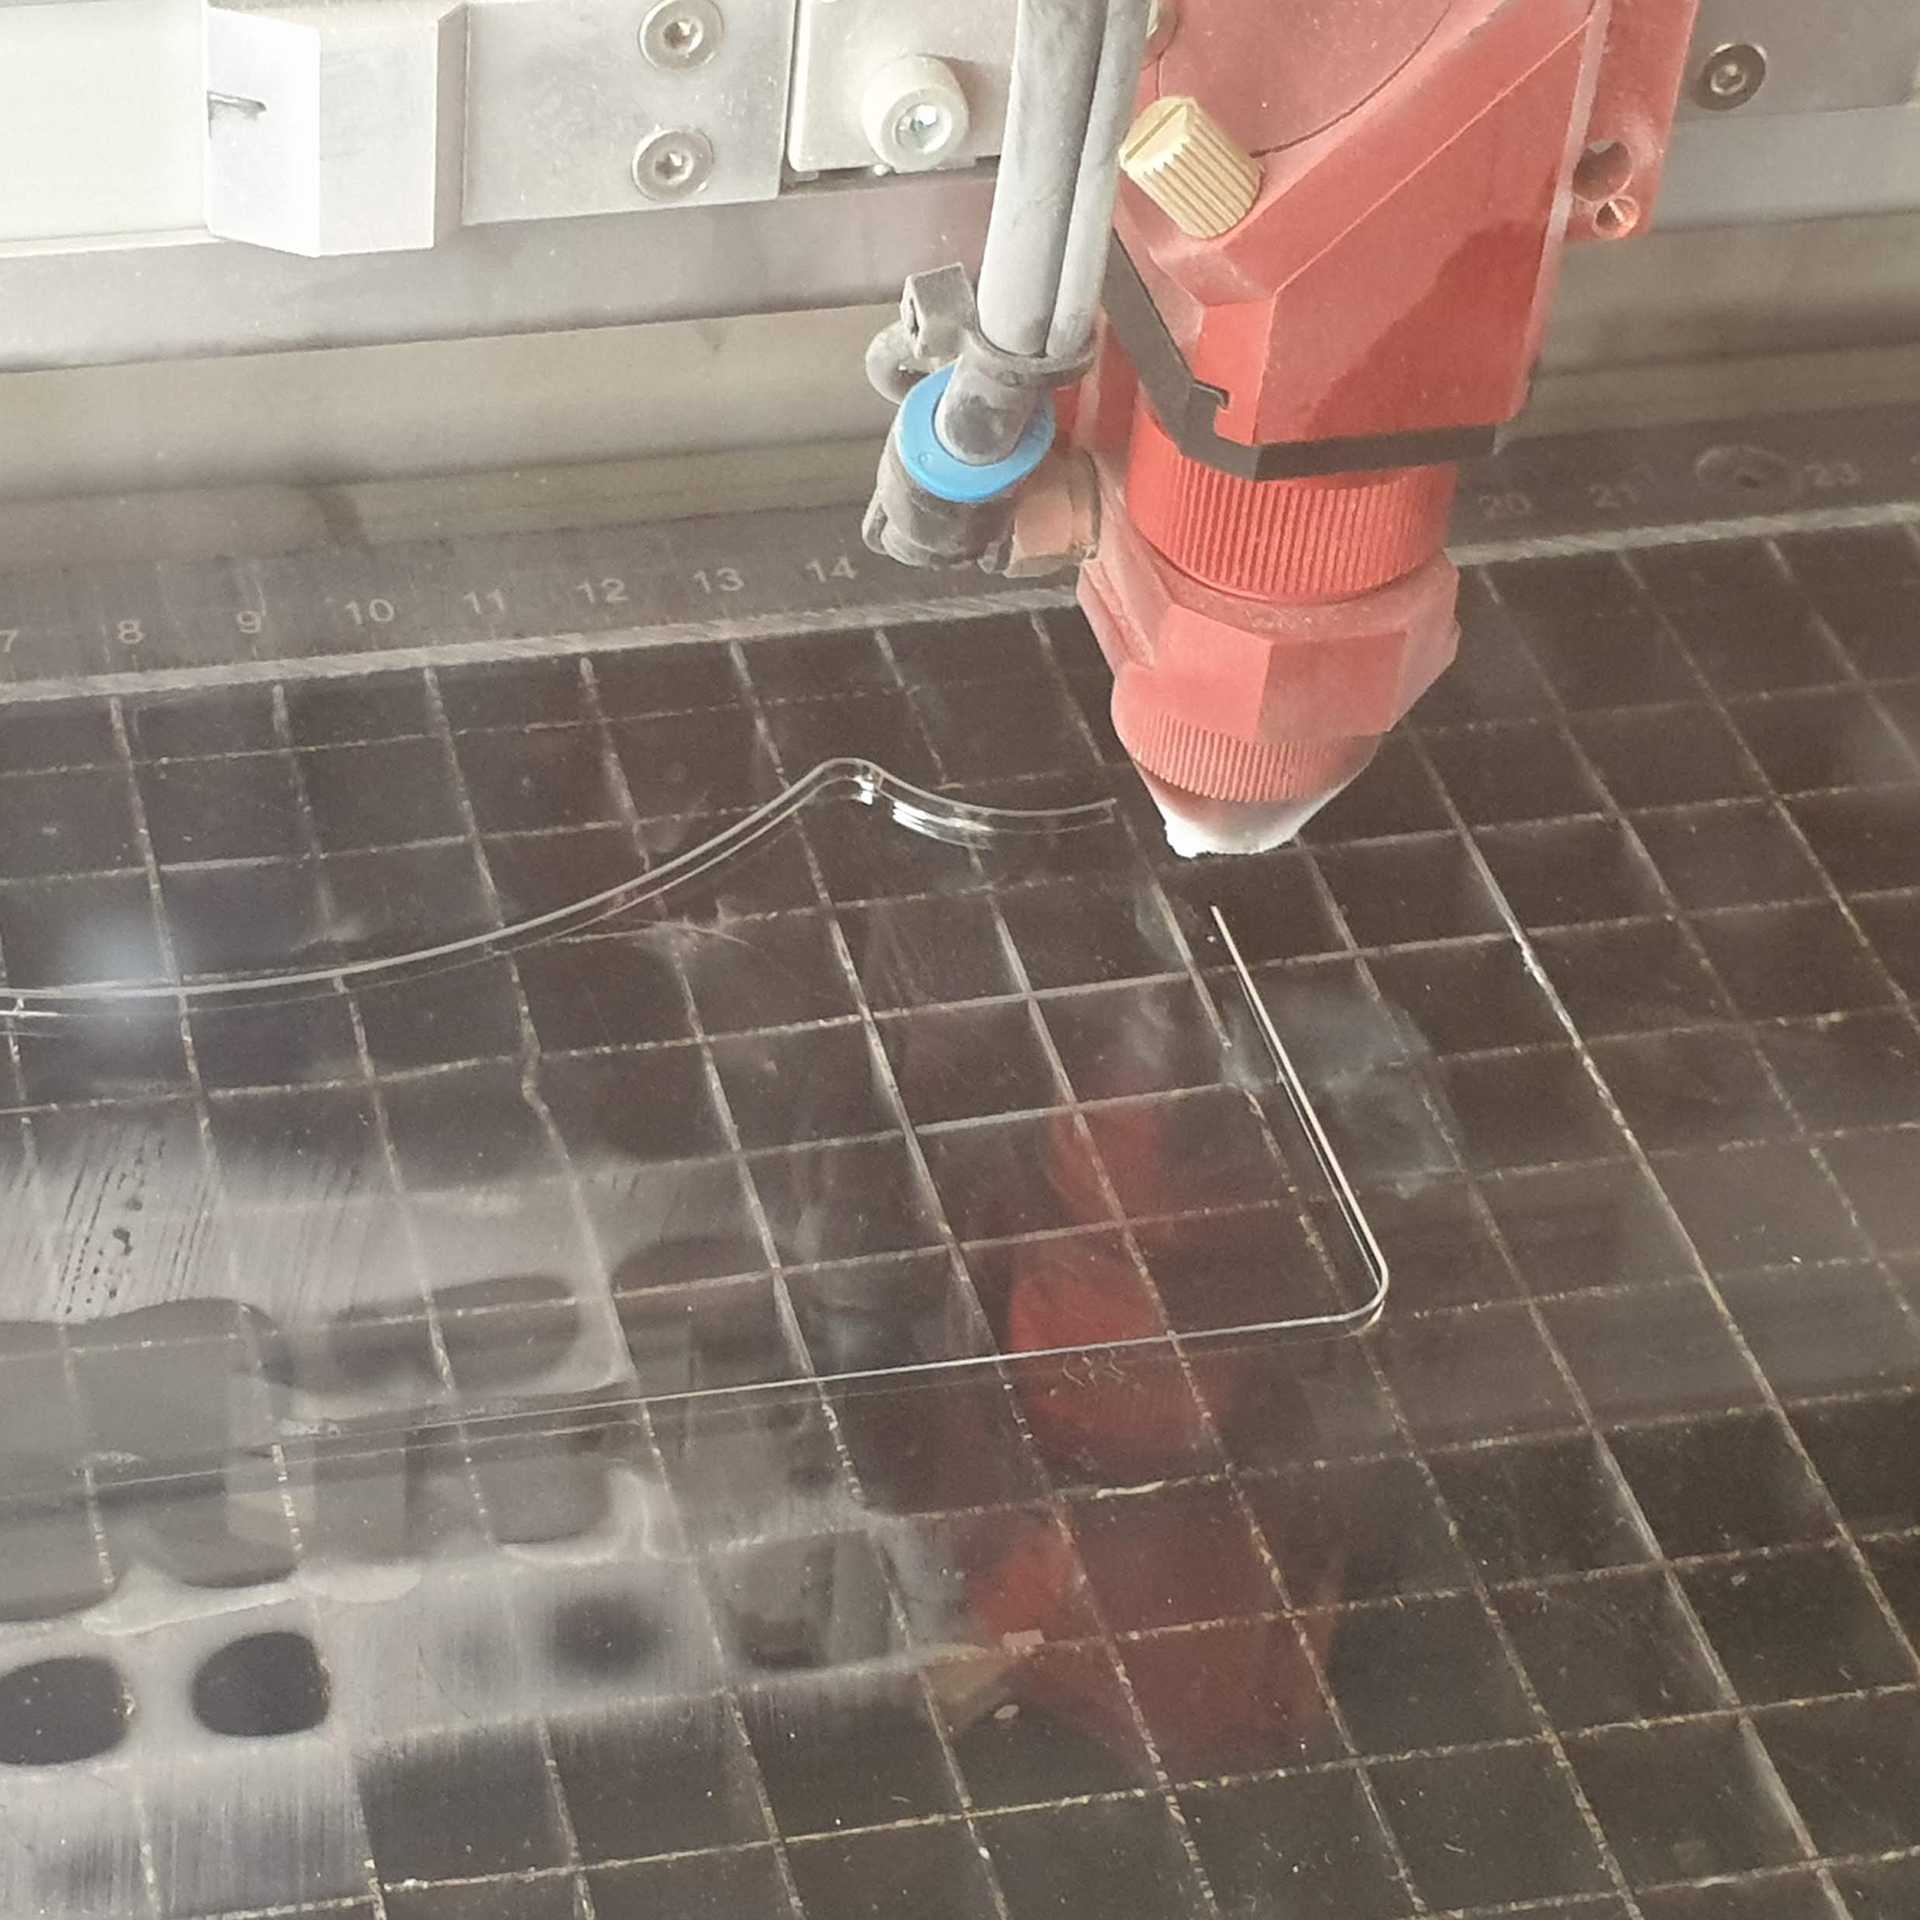
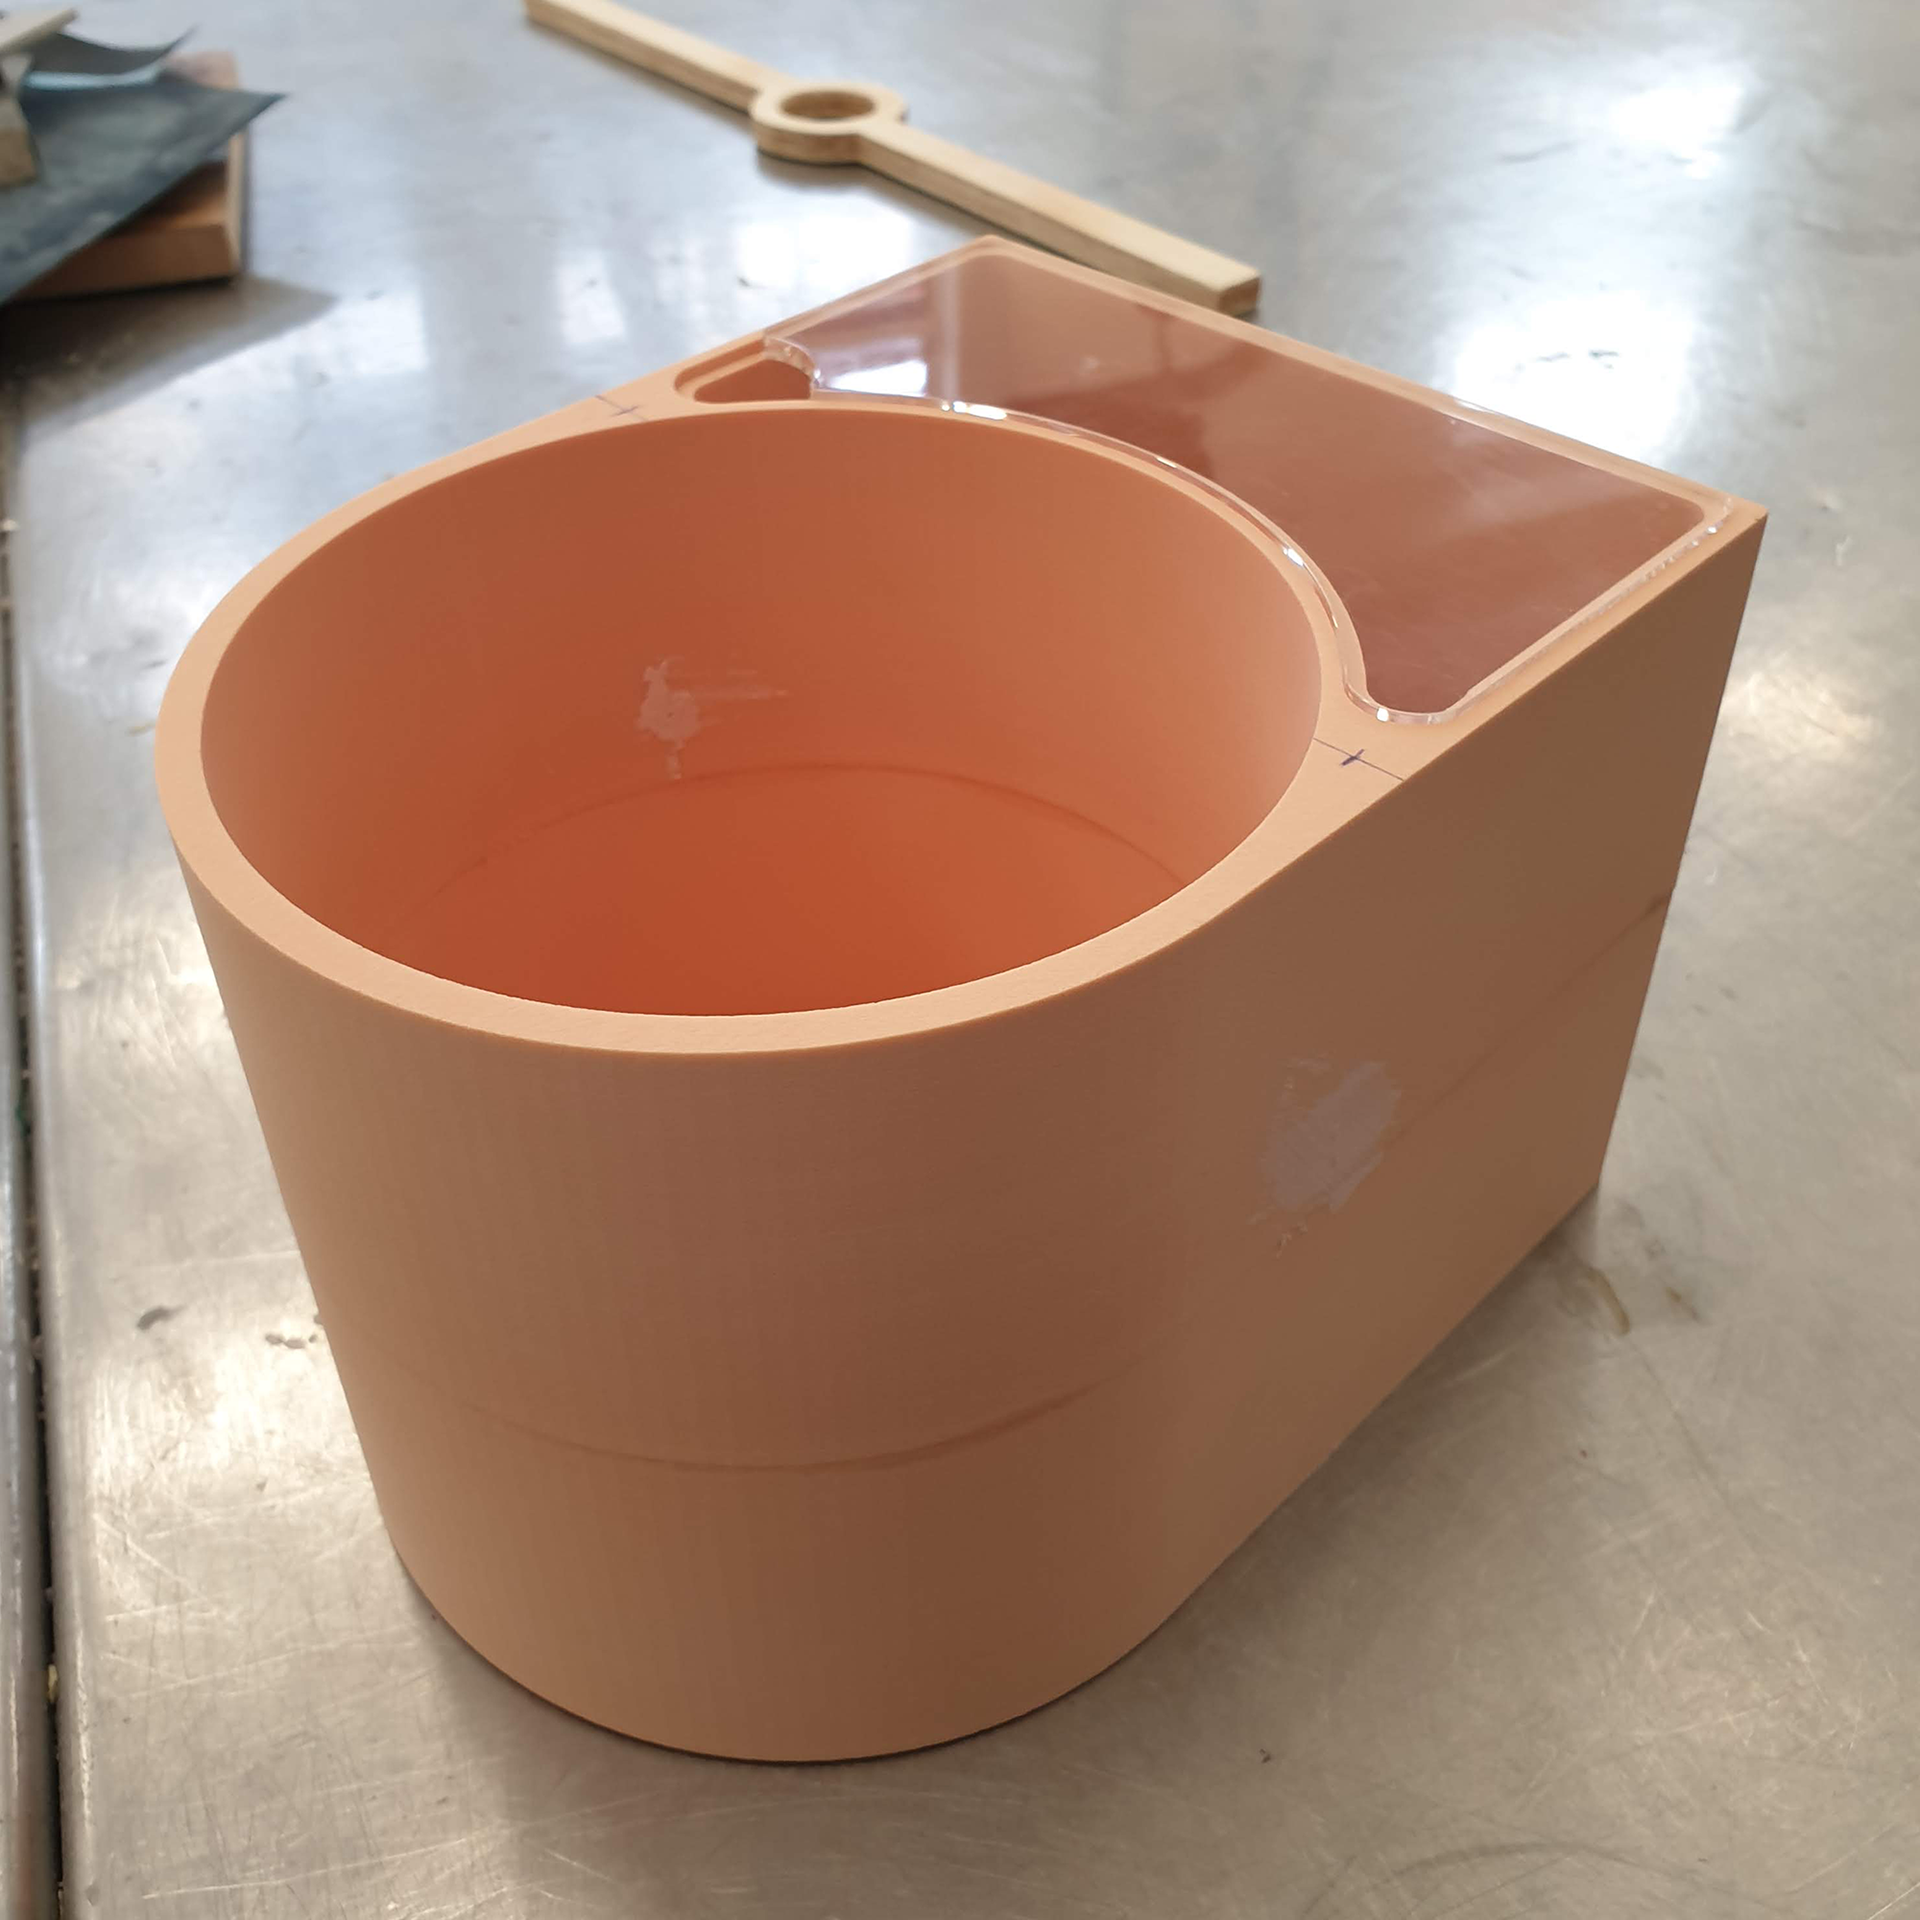
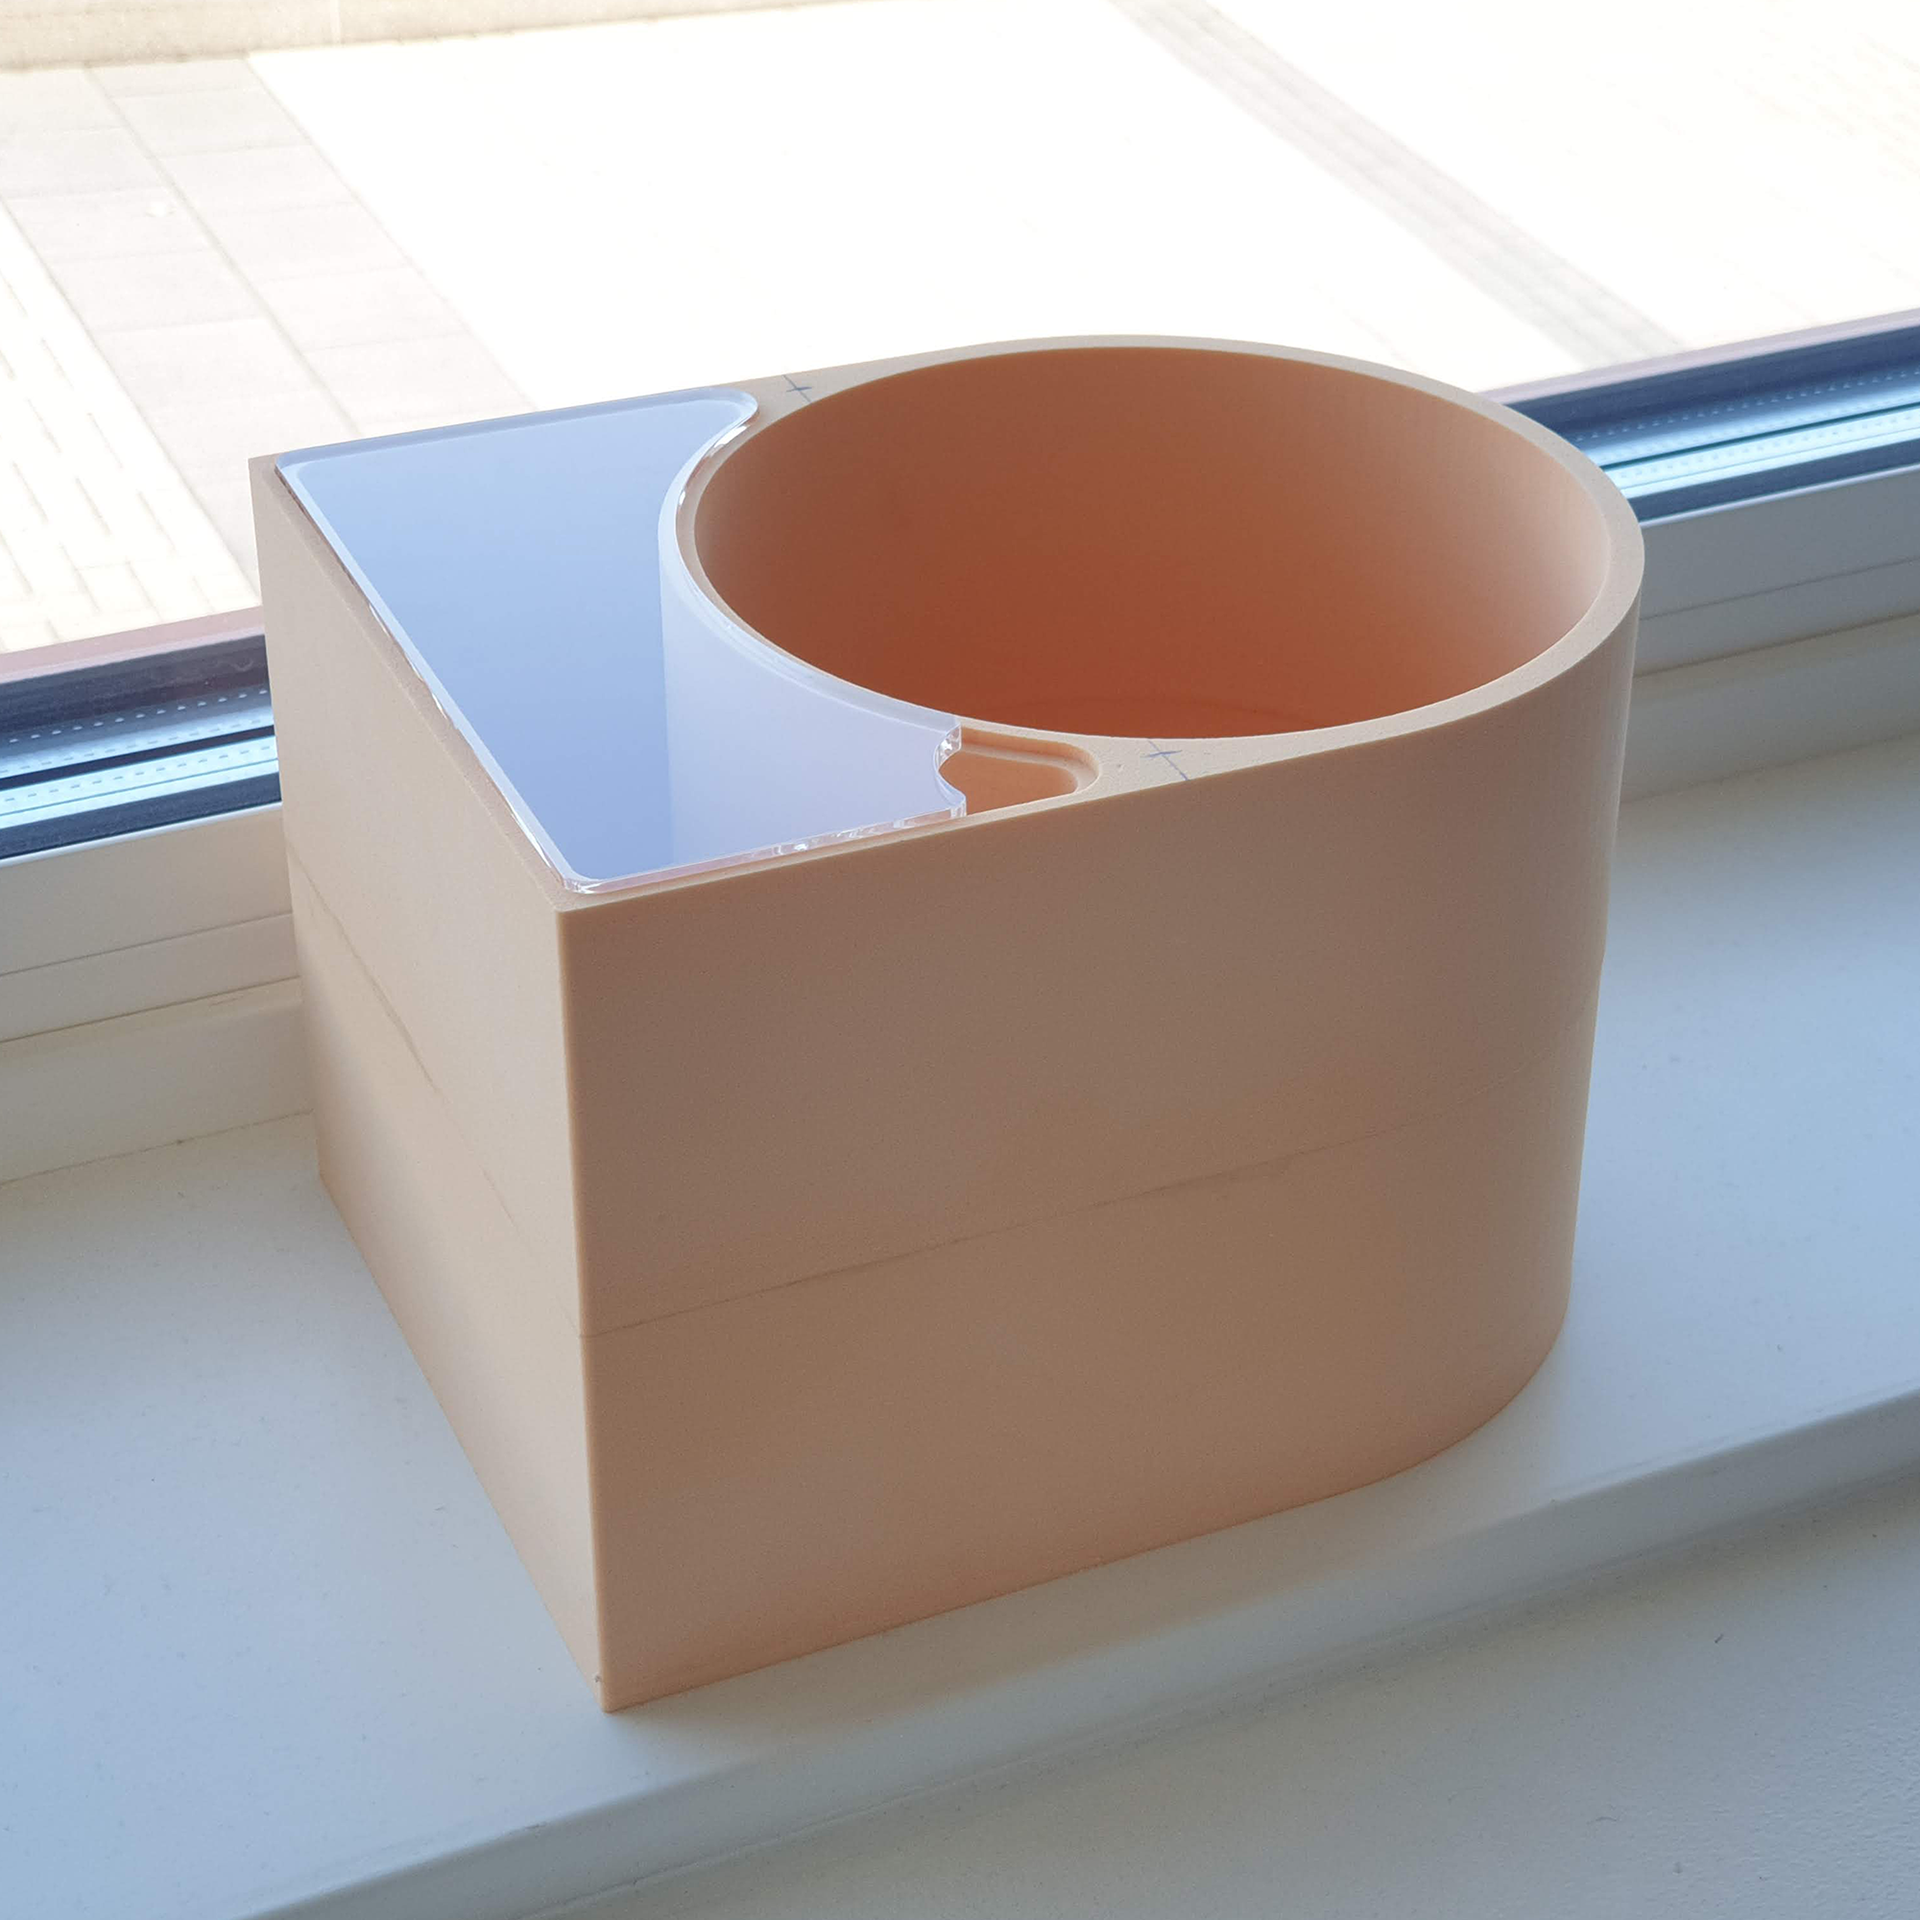
In order to make a prototype, the idea was first to 3D print the entire model, but that would take far too long and require a lot of material. A discussion about the prototype with a teacher at LTU resulted in the prototype of the pot being milled out of a foam material and the lid being cut out of Plexiglas with a laser. The CAD model for the pot was too advanced to mill with many small roundings, which meant that a special model had to be made for the milling where, among other things, roundings, the space for the pump and the holes for the hoses were removed.
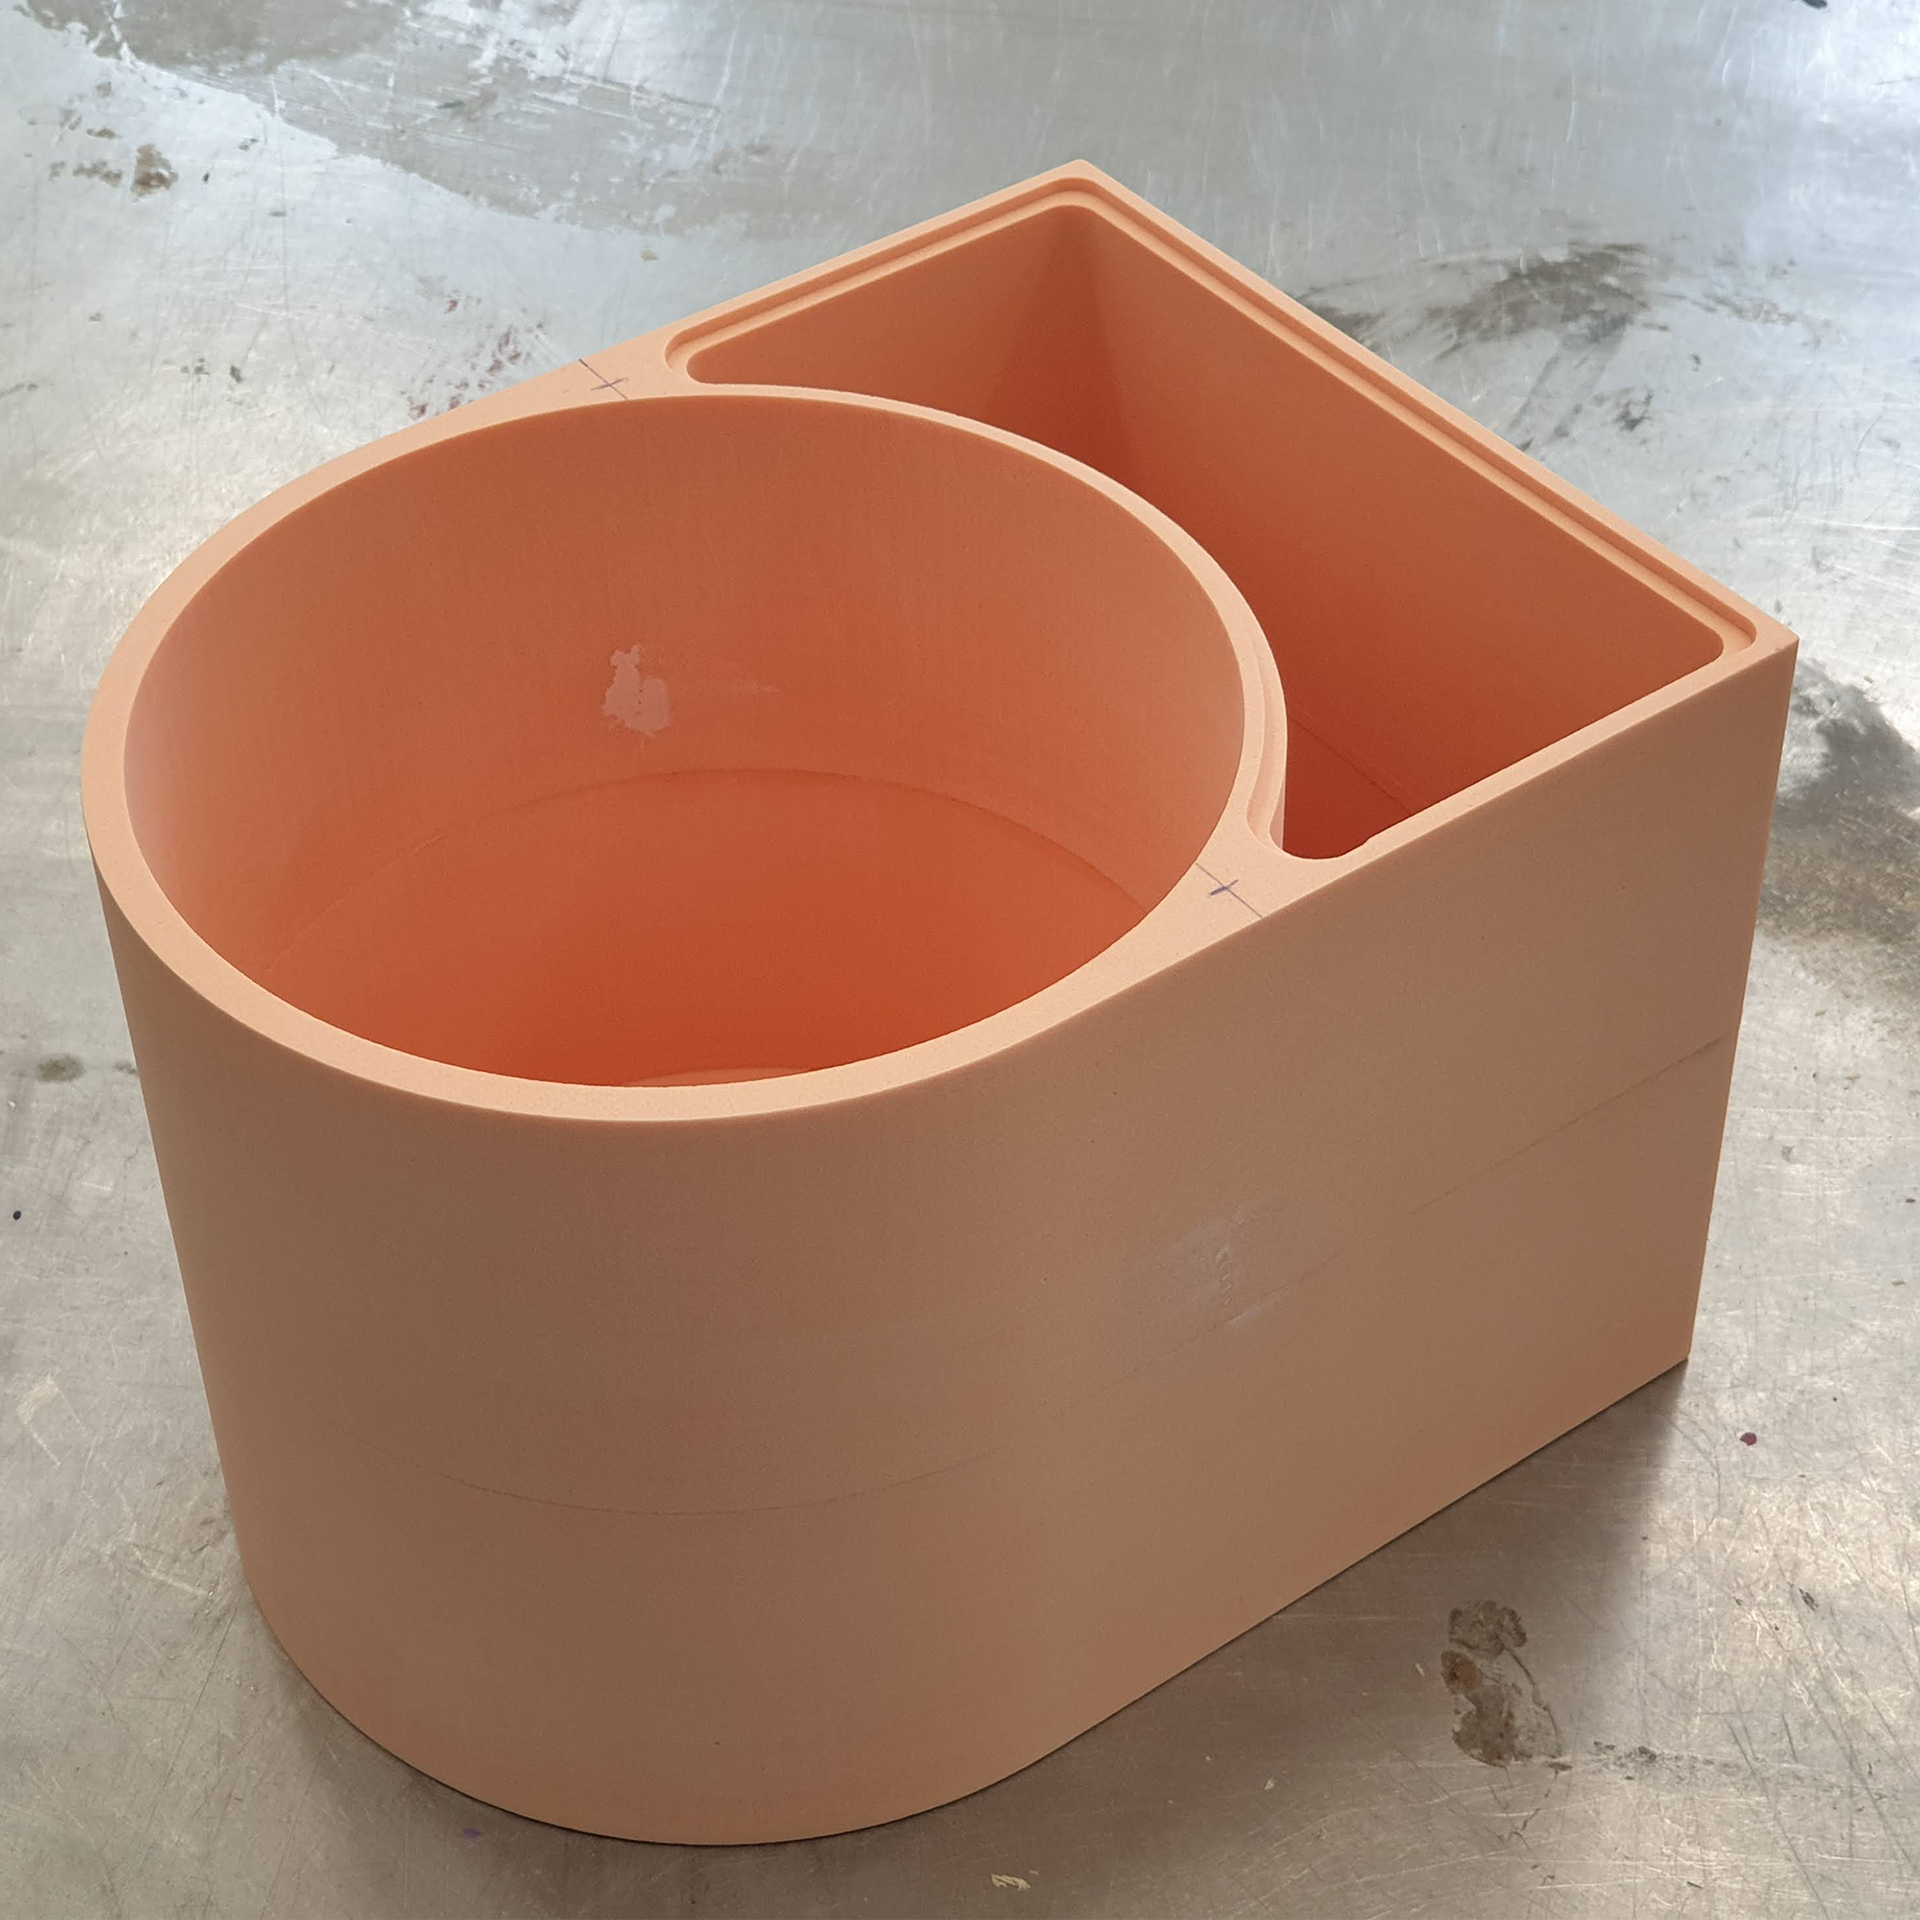
After milling, the two halves were glued together, the holes repaired, the outside sanded and the lids started to be cut out. Finally, the lid was mounted on the pot to test the function of being able to open the lid and to see how big the pot would be in reality.
Milling
Bonding
Repair holes
Grind
Cut out lids
The lid fits

Opening to the lid
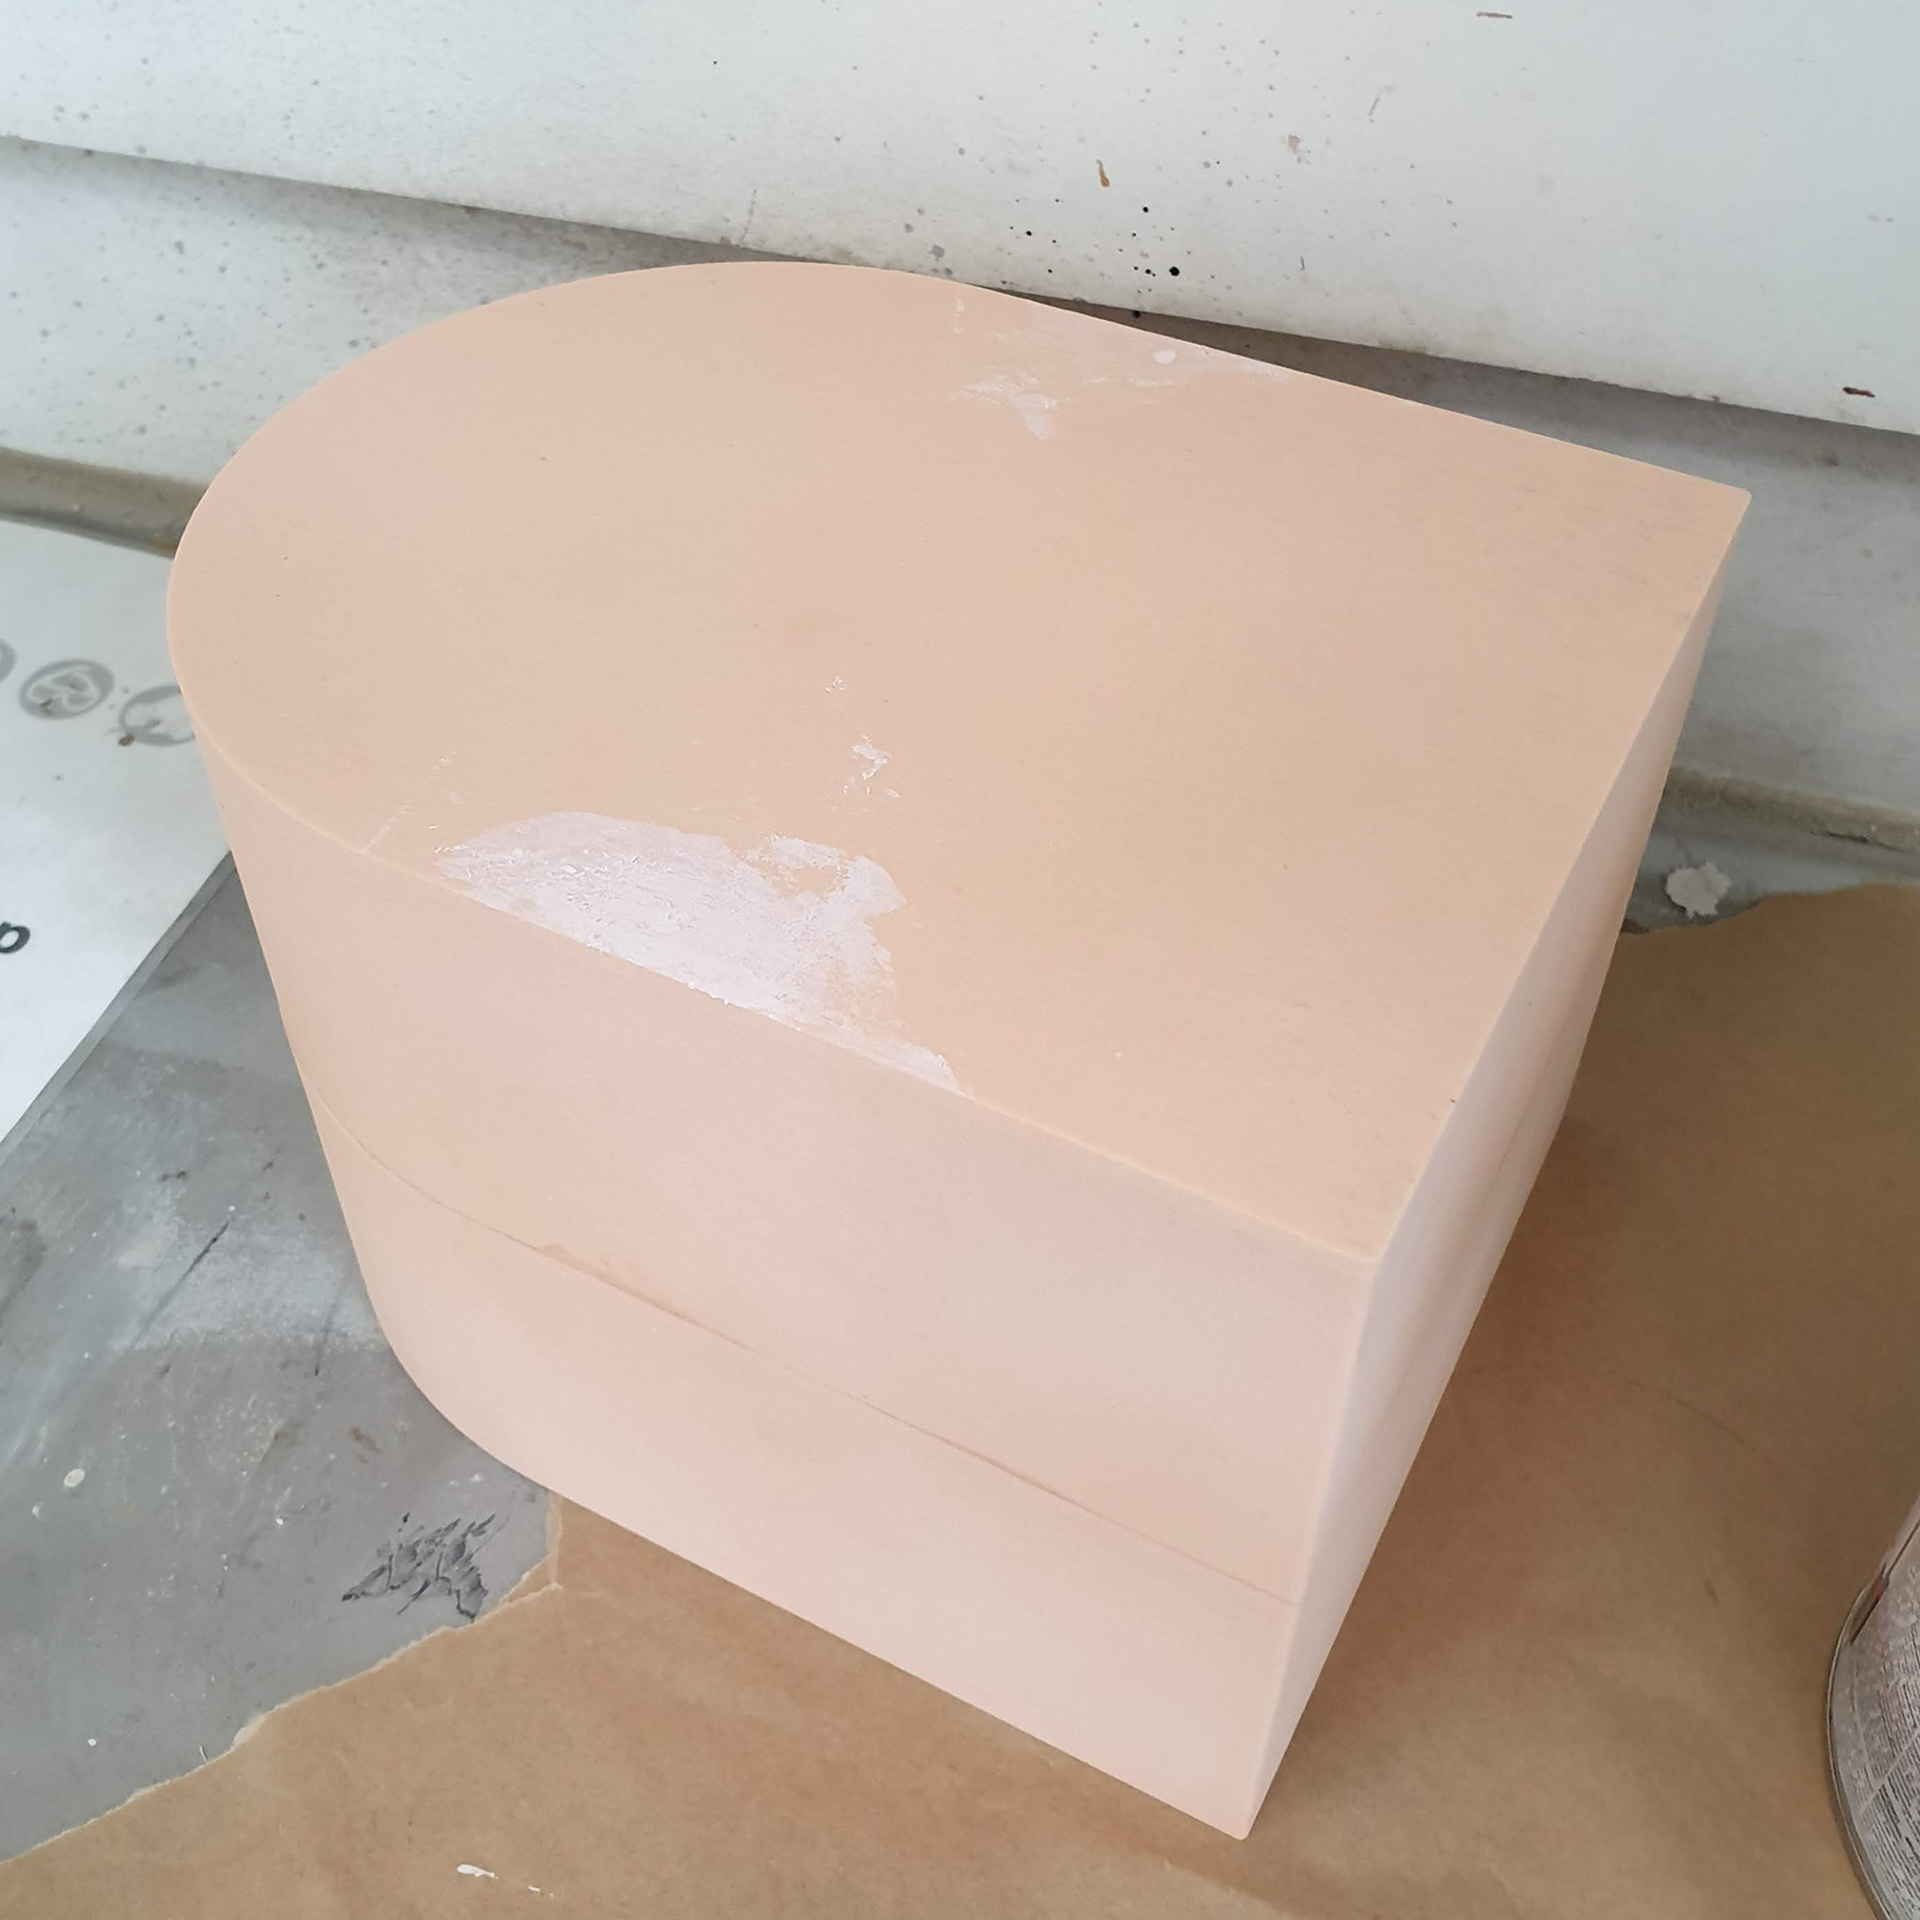
Ready for painting
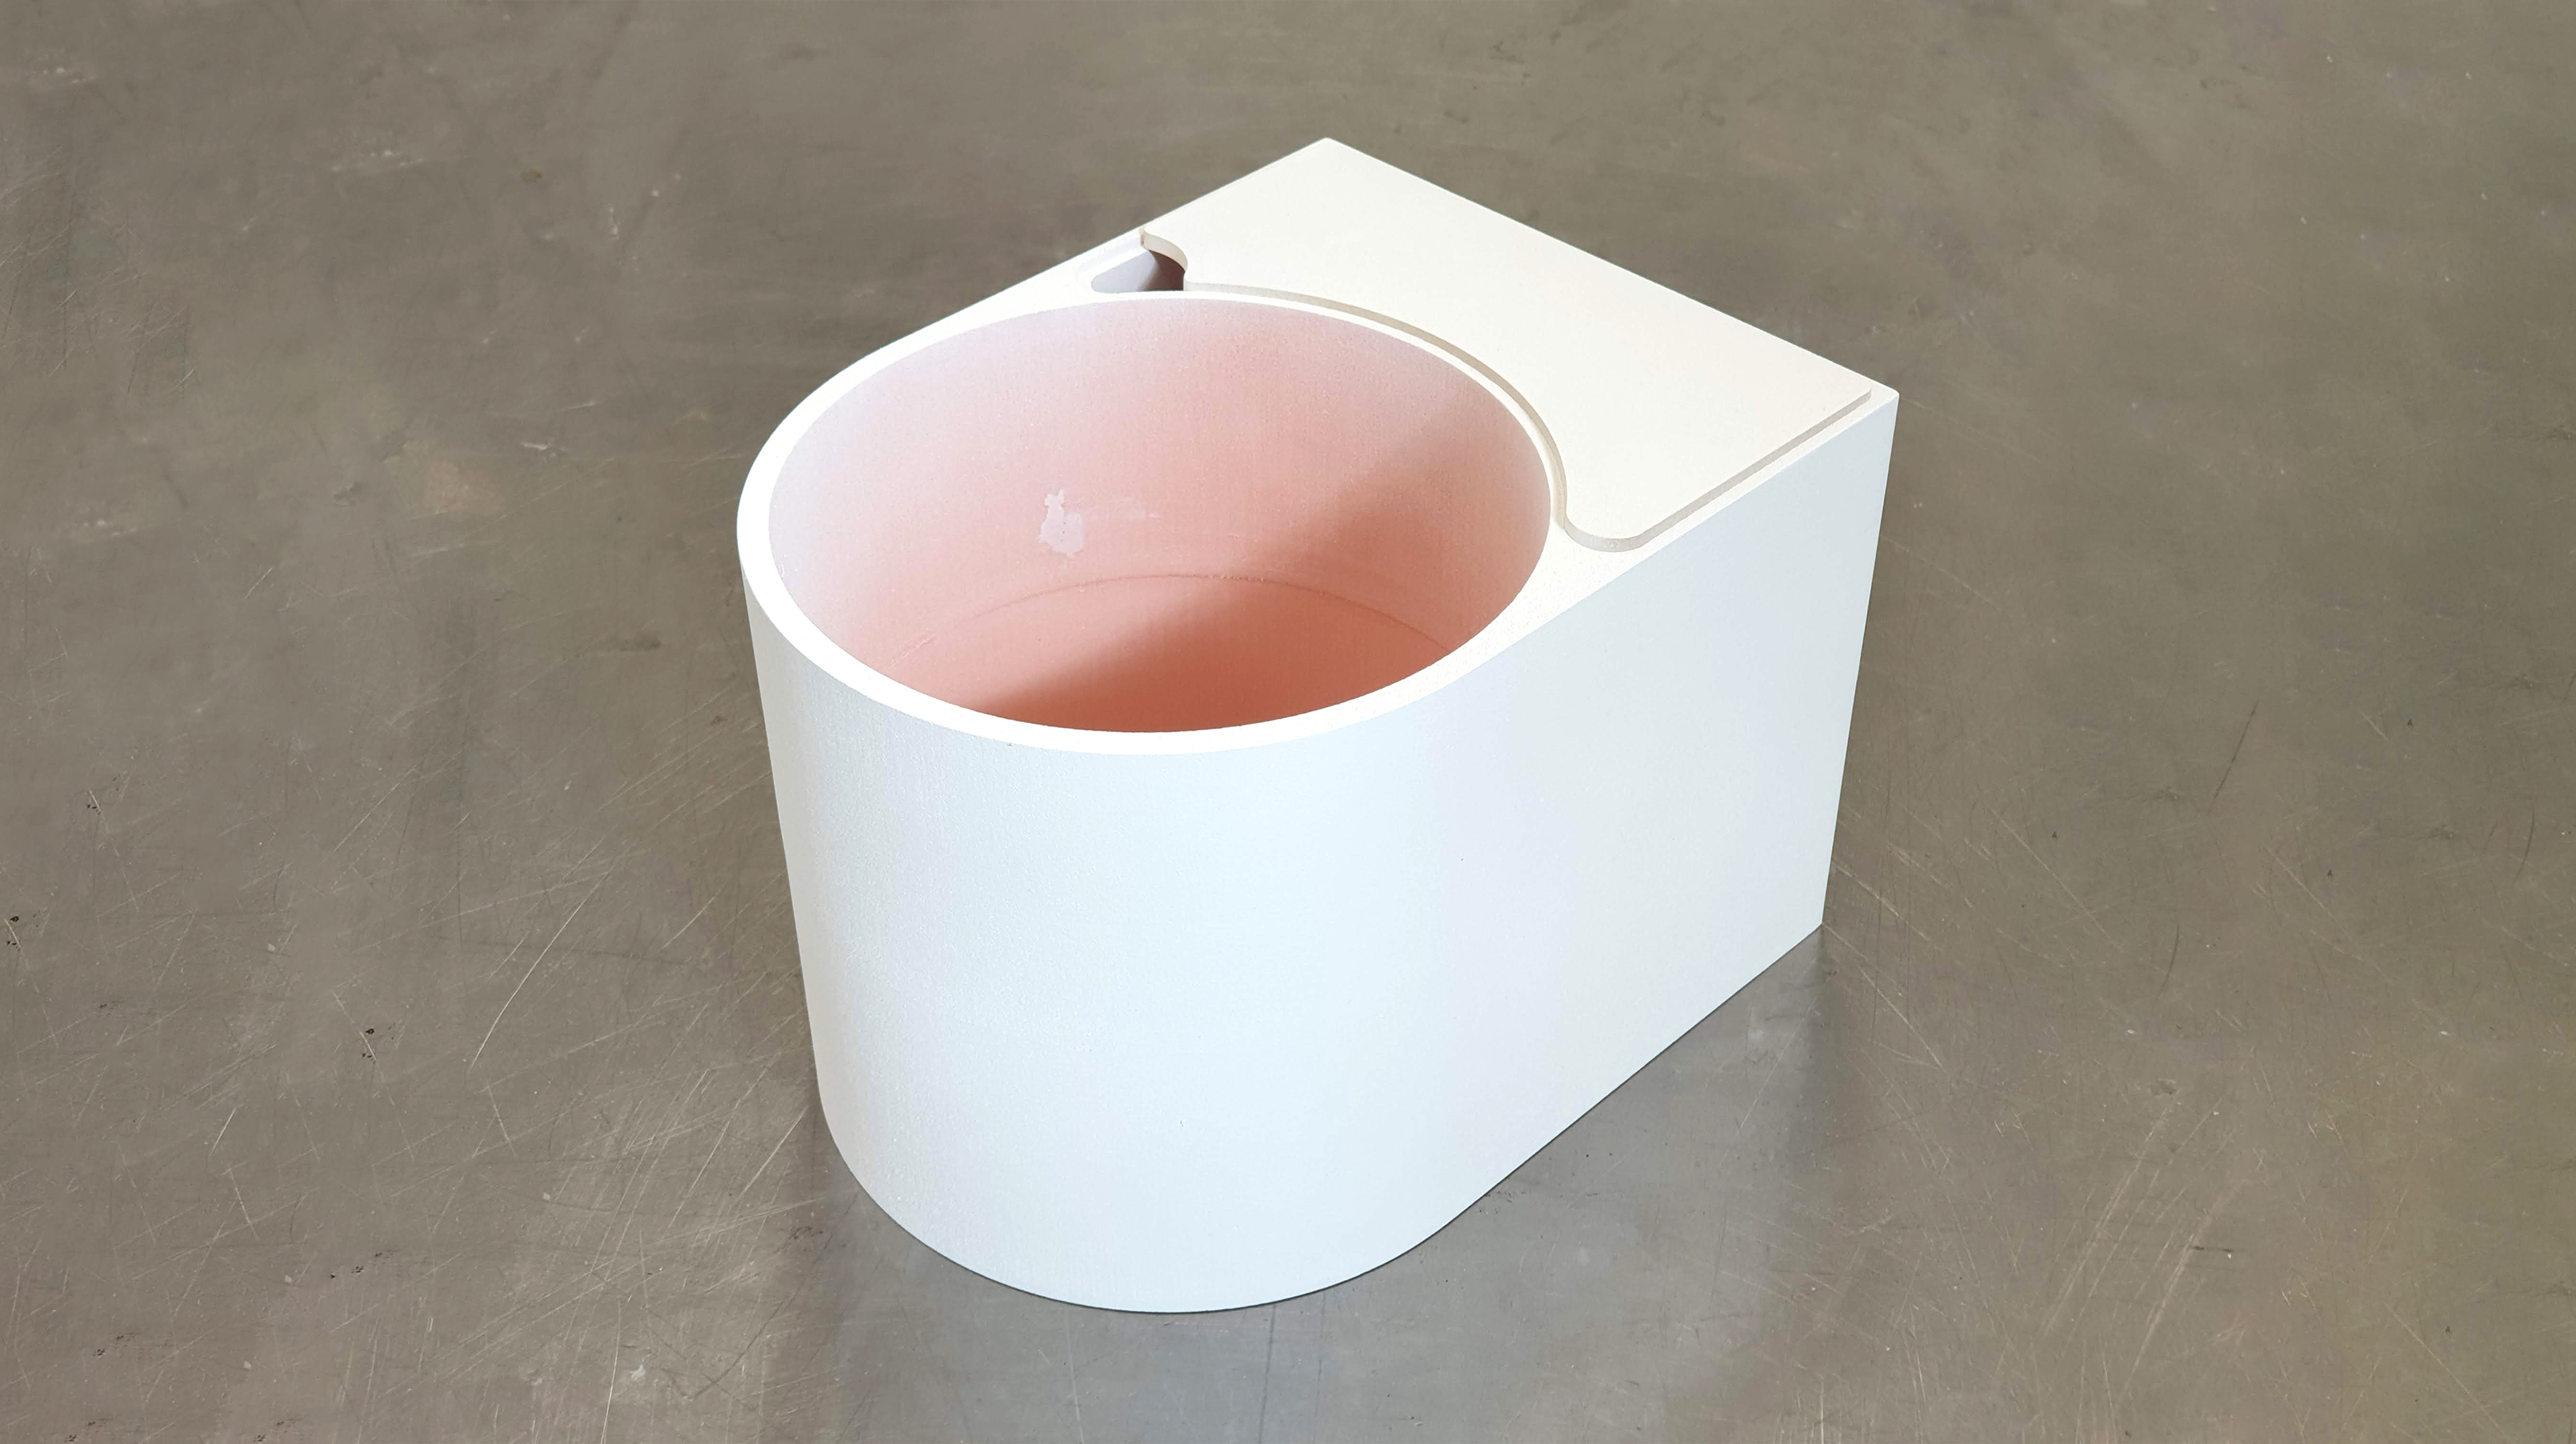
Painted prototype
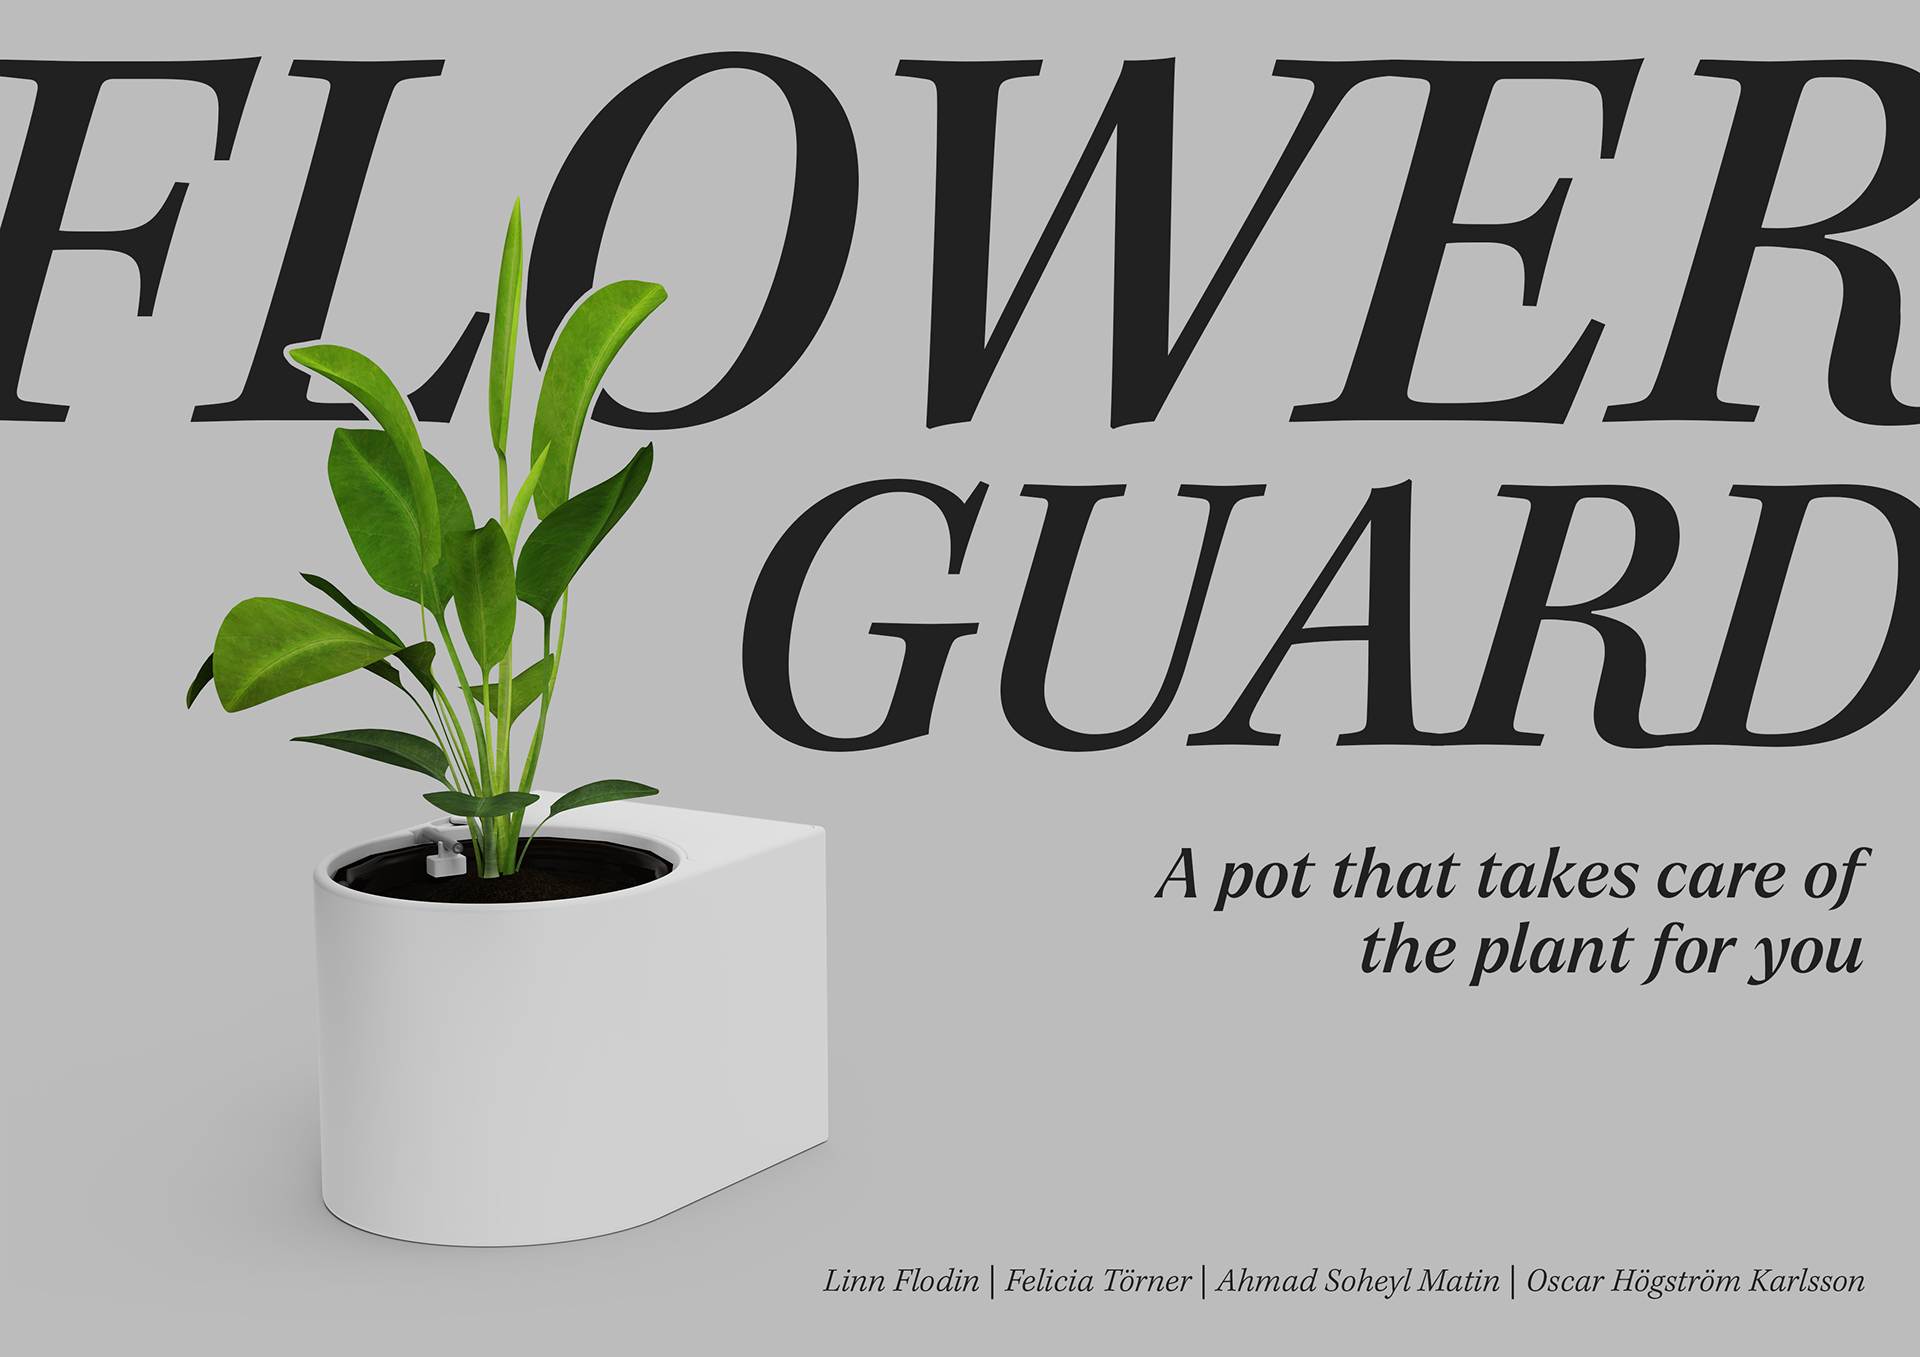
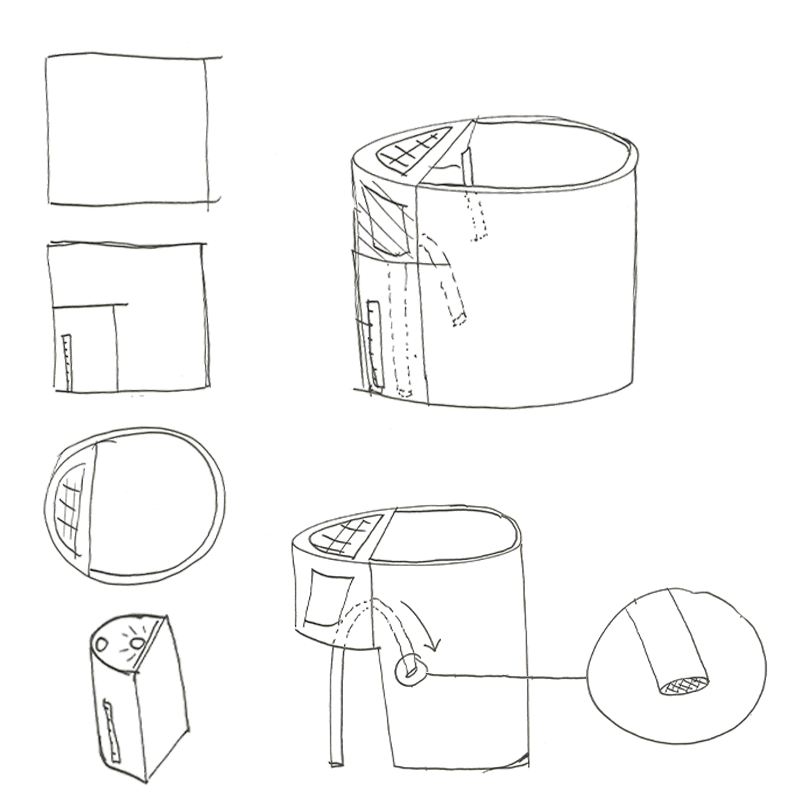
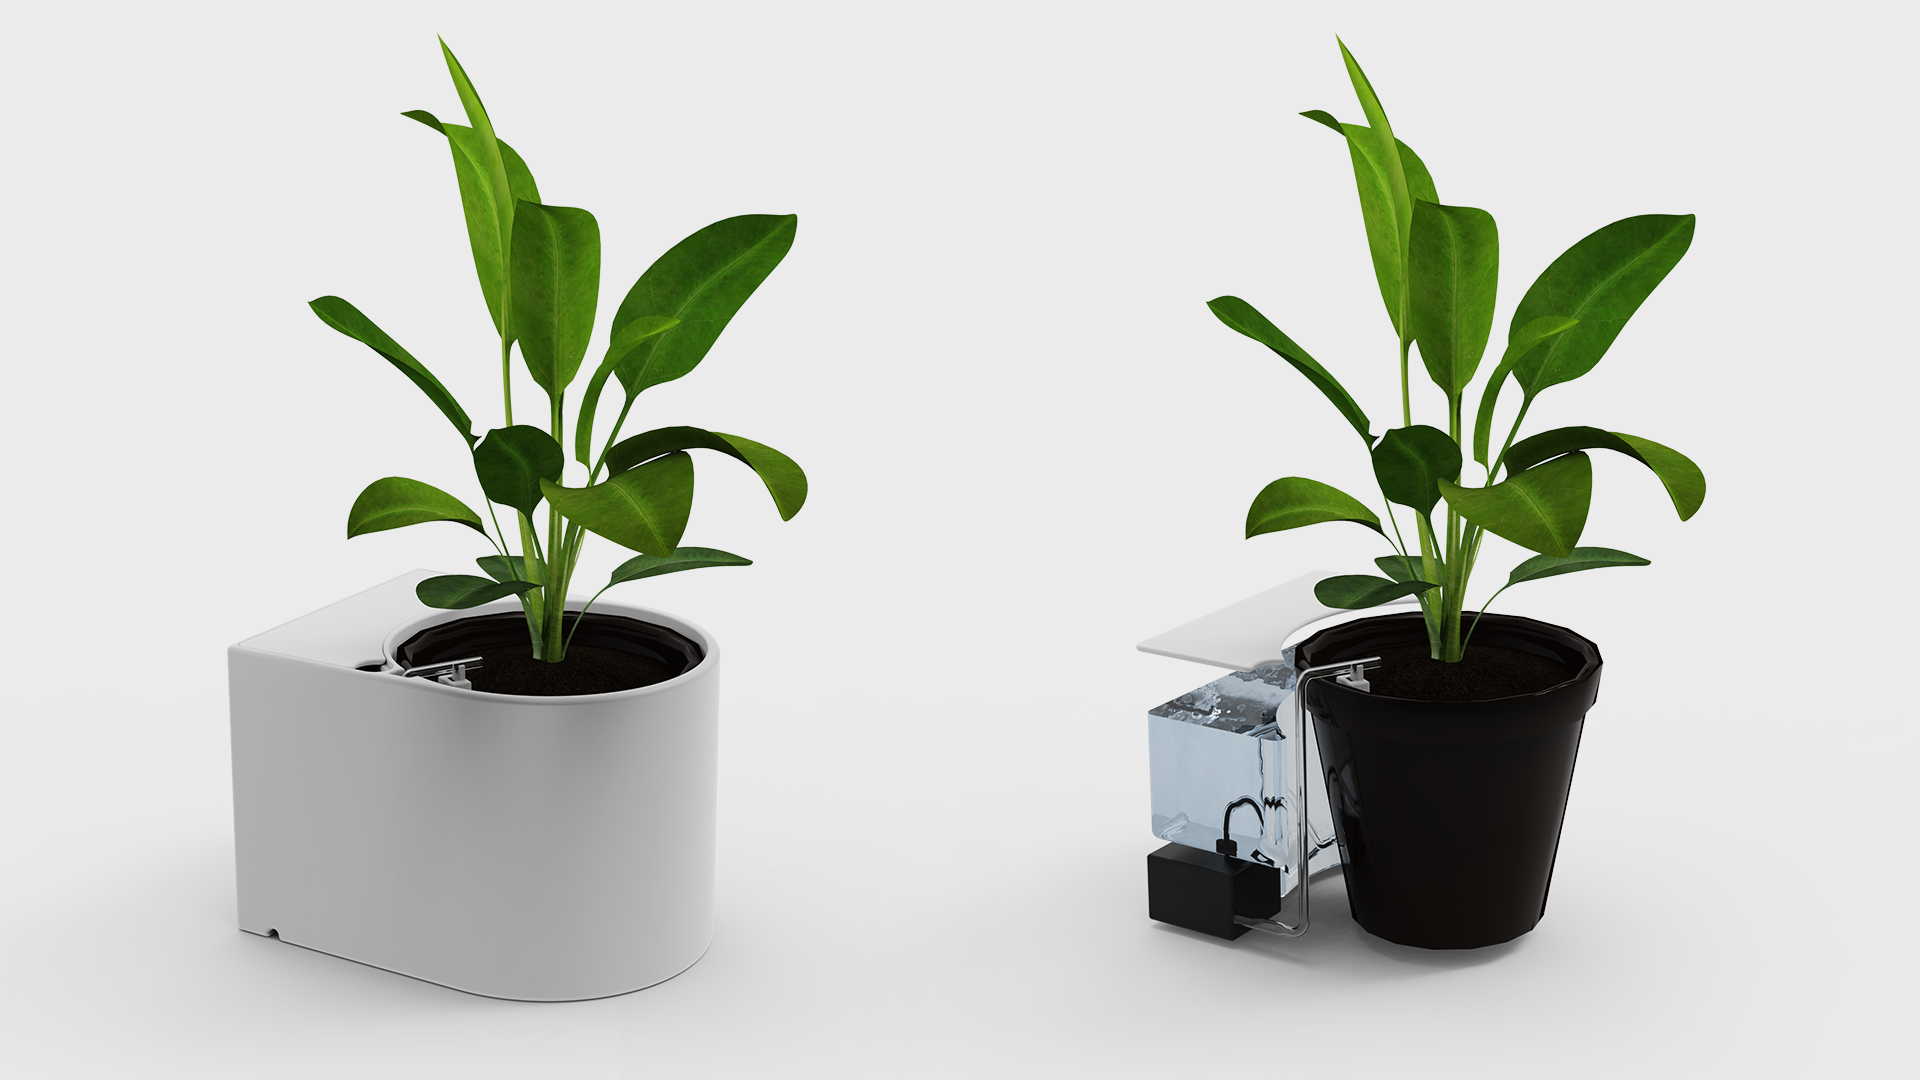
Final concept
The final result is visualized below and is a pot with a built-in water tank named Flower Guard. With the help of a sensor that detects how dry the soil is, the plant is watered when the dryness has risen to the desired level. Three different modes can be selected on the associated microcontroller. These control how dry the soil should be before the plant is watered.
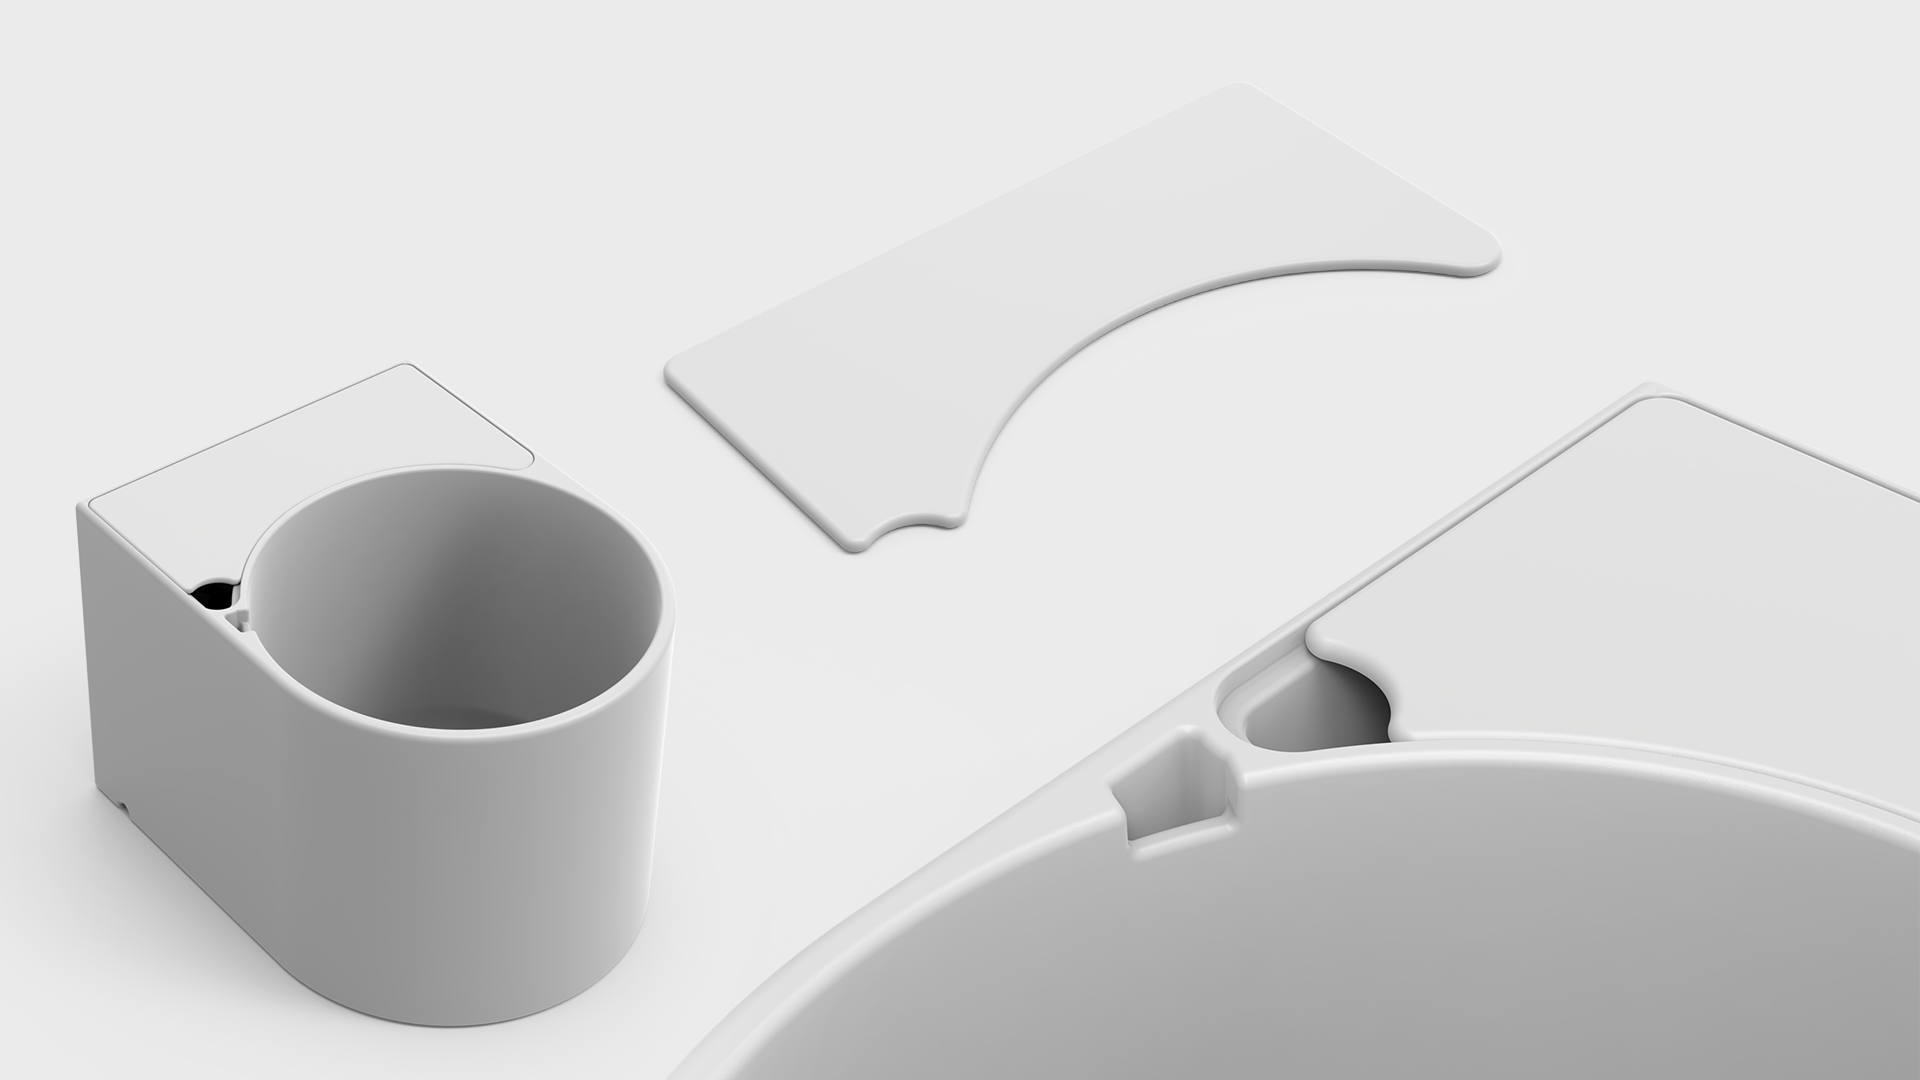
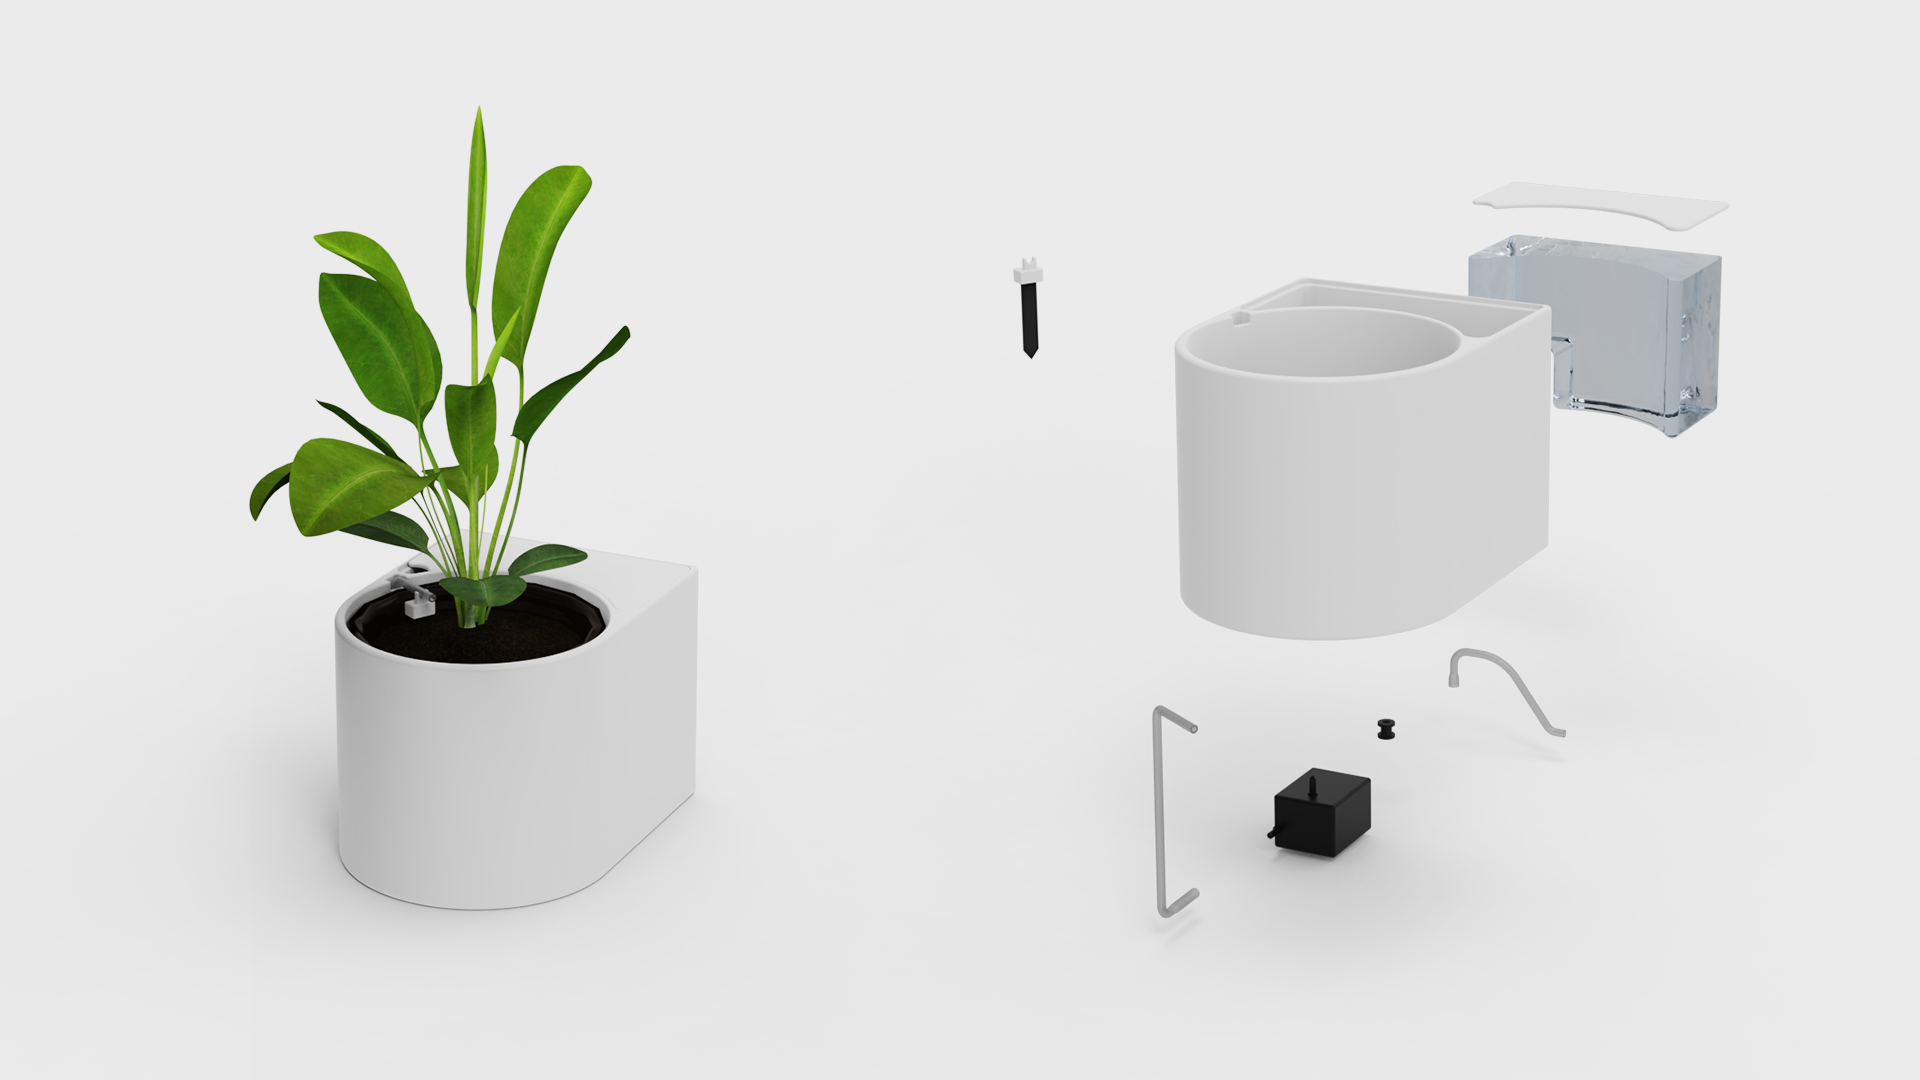
The pot
The pot consists of two compartments, a rectangle for the water and a circular one where the plant is placed. To plant the plant, you can put an inner pot there or fill the pot with soil. The pot has no sharp edges but follows a rounded theme. Between the pot and the water tank is a space that looks like a triangle. Through that hole runs a hose from the pump to the plant. In the bottom corner where the pump is located, there are also two holes for the power cord to go, either straight out of the back of the pot or straight out of the pot to the side.
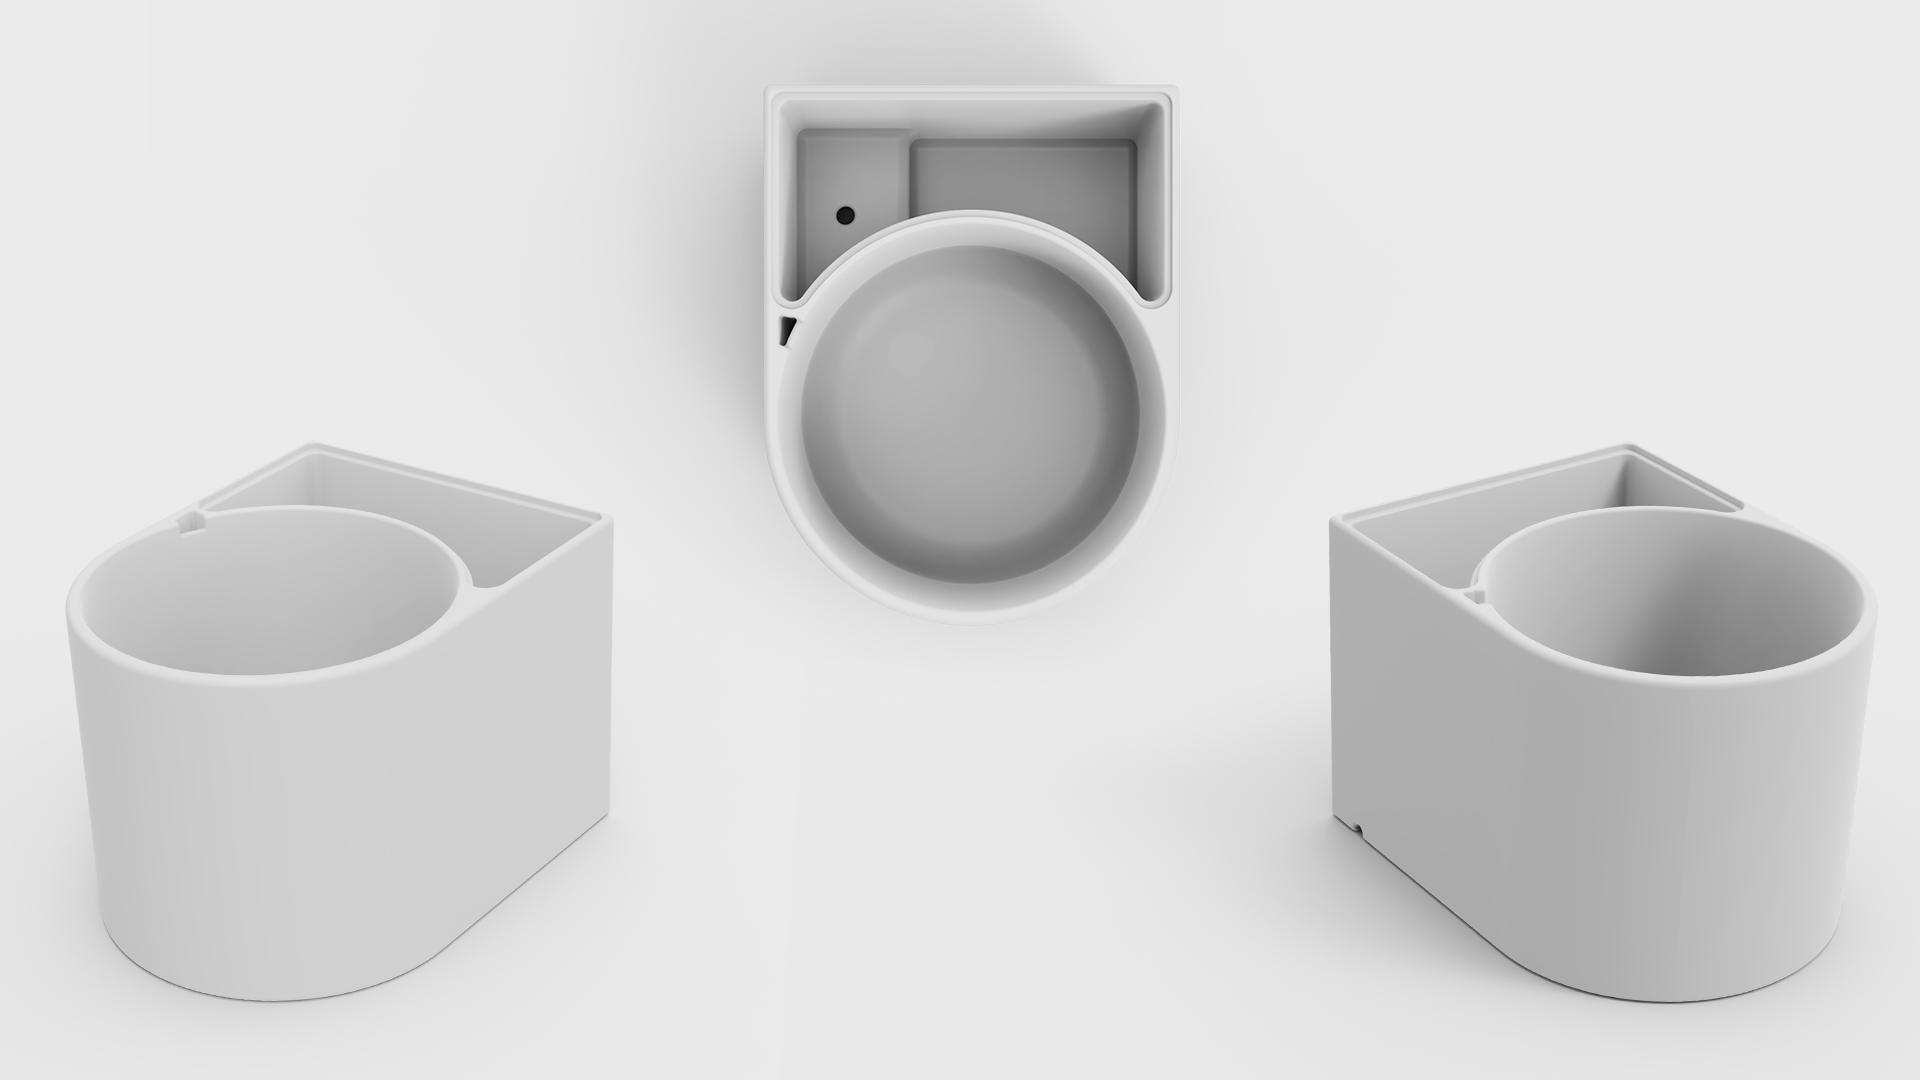
The lid
The lid is shaped to rest on a ledge in the water container, which means that the top surface of the lid is flush with the top surface of the pot. To be able to open the lid, there is a small hole in one of the corners. The size of the hole is adapted so that a finger can easily get through and lift the lid. The lid can be turned if you want the hole to be located on the other side.
The microcontroller
The microcontroller is placed on the power cord but can also be wireless and controls the pump together with the sensor. There are three modes on the control, all of which have a light that indicates which mode is selected using the knob on top of the control. The three modes to choose from are:
Dry: The soil must dry up before watering the plant. Which can suit, for example, mother-in-law tongue and porcelain flower.
Semi-moist: There is still some moisture in the soil when the plant is watered. The location suits ivy and peace seekers.
Moist: The soil is kept constantly moist and is suitable for, among other things, hydrangea and azalea.
These levels are based on Plantagen's definition of water needs where plants are divided according to how moist the soil should be before the plant needs to be watered. It is also from the Plantagen's website that we have obtained information about all the plants.

Material and colors
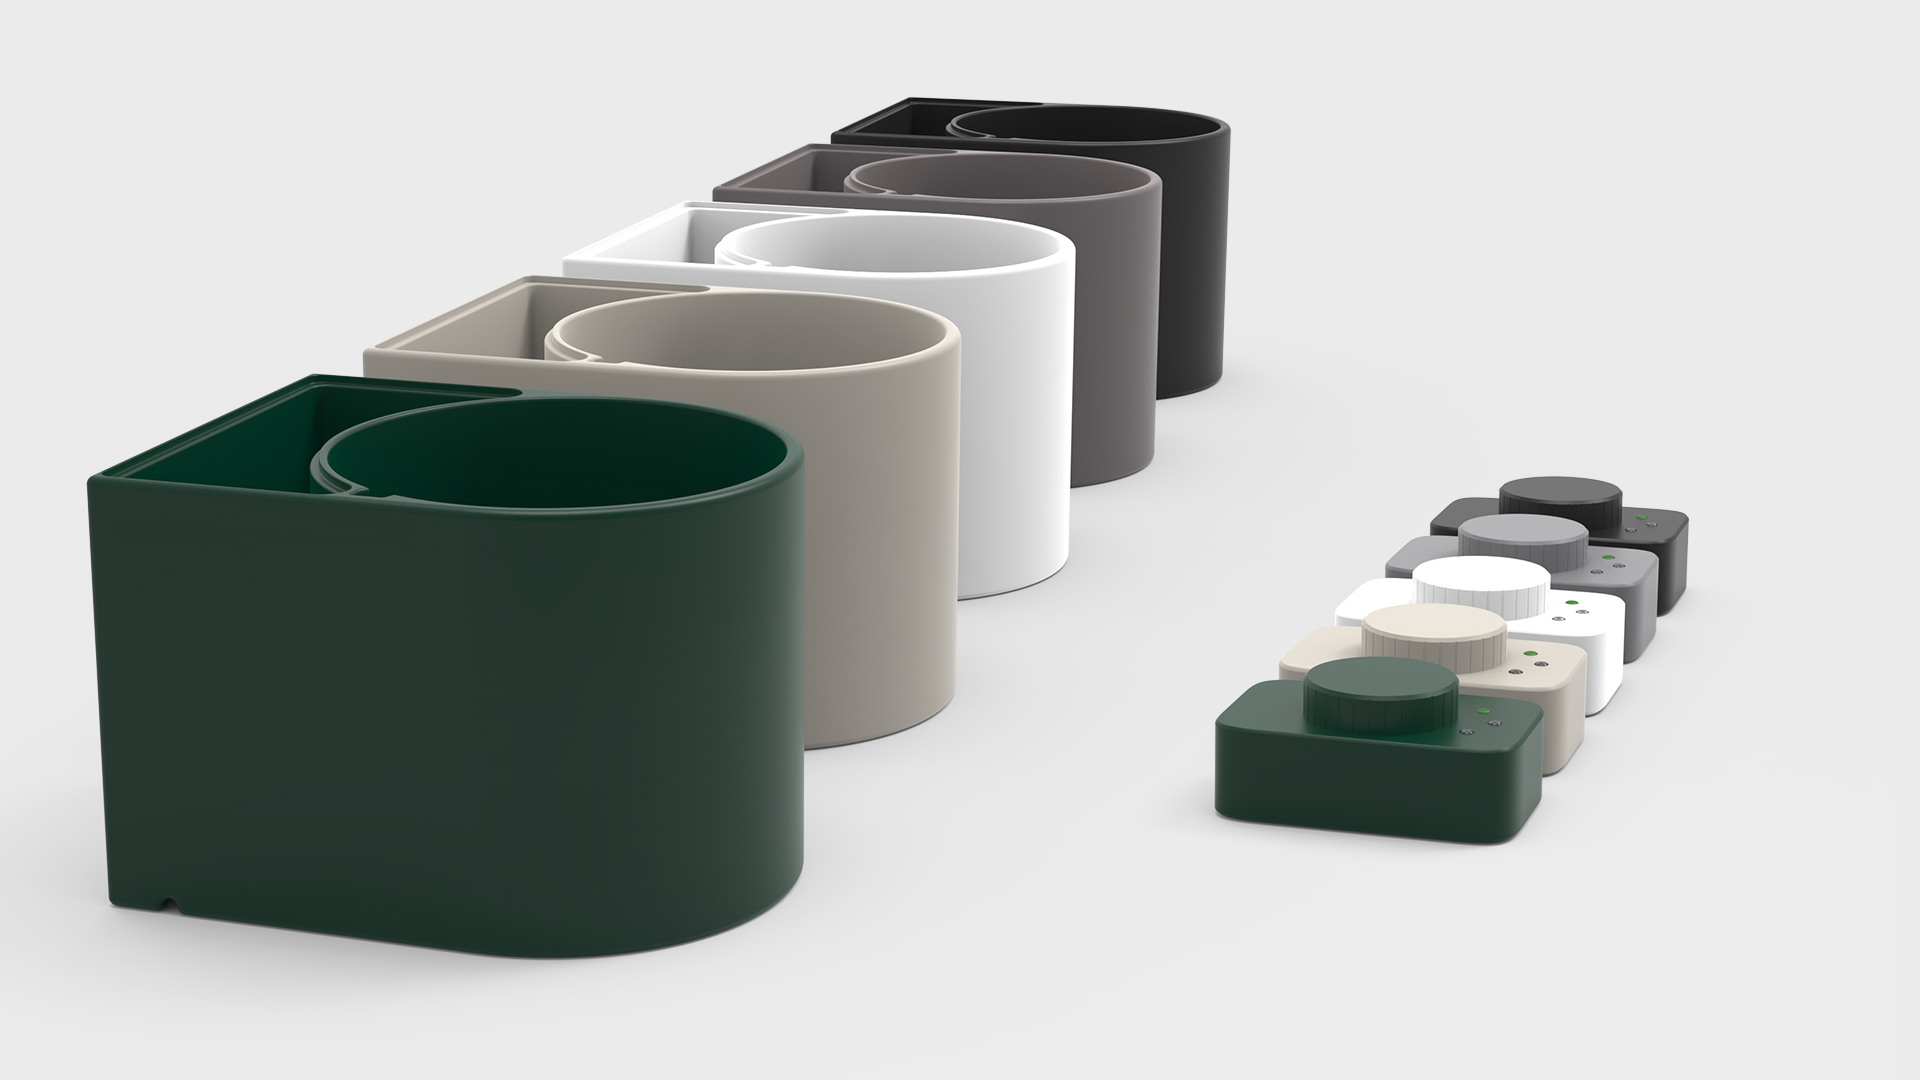
The material for the pot, the lid and the microcontroller is the plastic Polypropylene (UV stabilized) and has been chosen with the help of CES Edupack provided by Luleå University of Technology. The material can be injection molded, costs about SEK 19 kr/kg, has a low density, can withstand contact with water and is recyclable. The pot, the lid and the micro control are in the same material as they are injection molded at the same time in production. The material can also be dyed, which means that the parts can be in several colors. The colors that are supposed to be produced are Green, Beige, White, Grey and Black. These colors have been carefully selected to discreetly fit into every household, as they are colors that are classed as neutral and recurring.
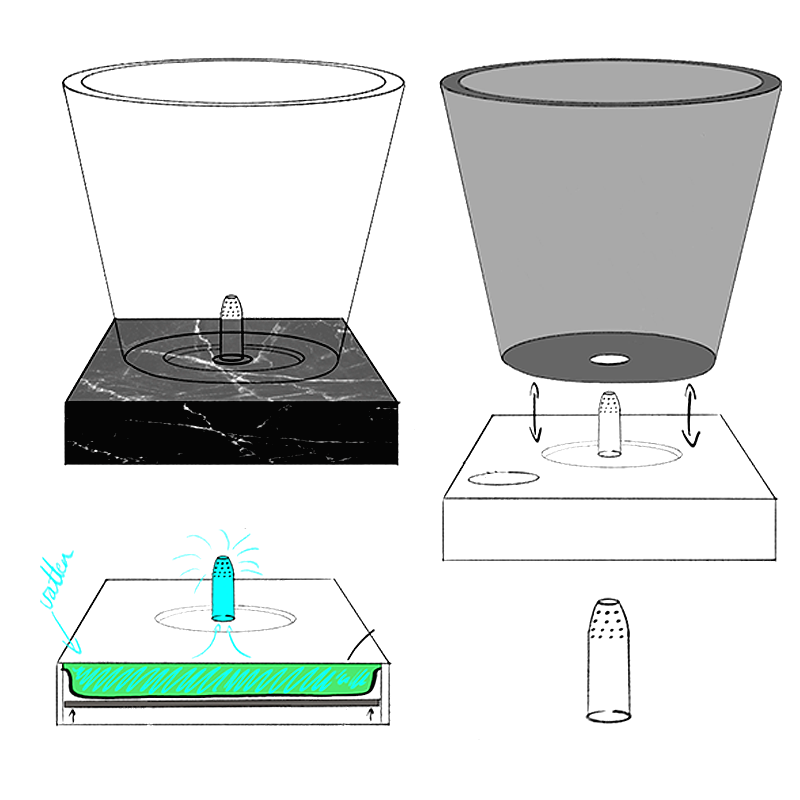
Sensor
A capacitive moisture sensor measures changes in capacitance as the soil becomes wetter. The higher the moisture level, the lower the capacitance of the sensor. The intention is that this information is processed in the microcontroller which activates the pump when preset levels are reached. In this way, the plant is watered depending on the different settings. This can be used to, for example, keep the soil constantly moist or water only when the soil has become completely dry. To hide and protect the sensor's electronics, a housing with a clip has been designed. The clamp is for guiding and keeping the hose in the right place.
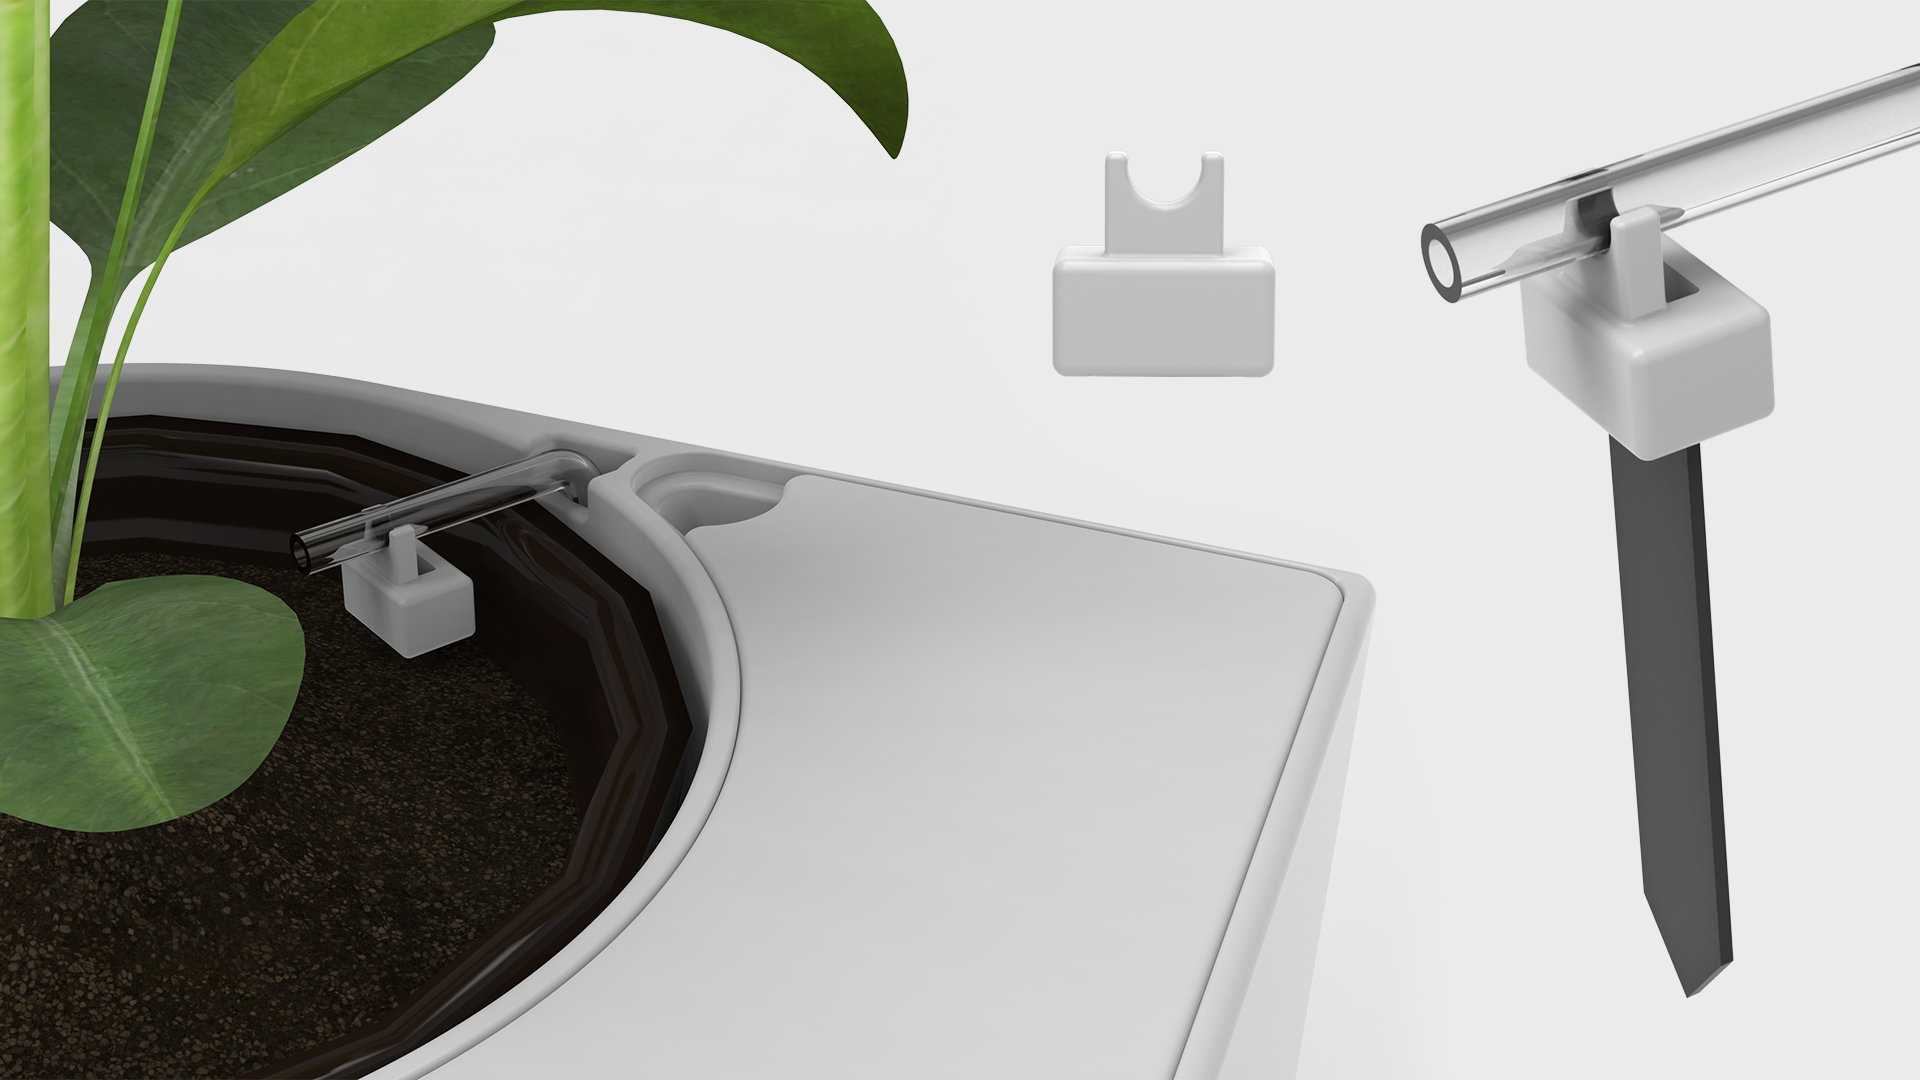
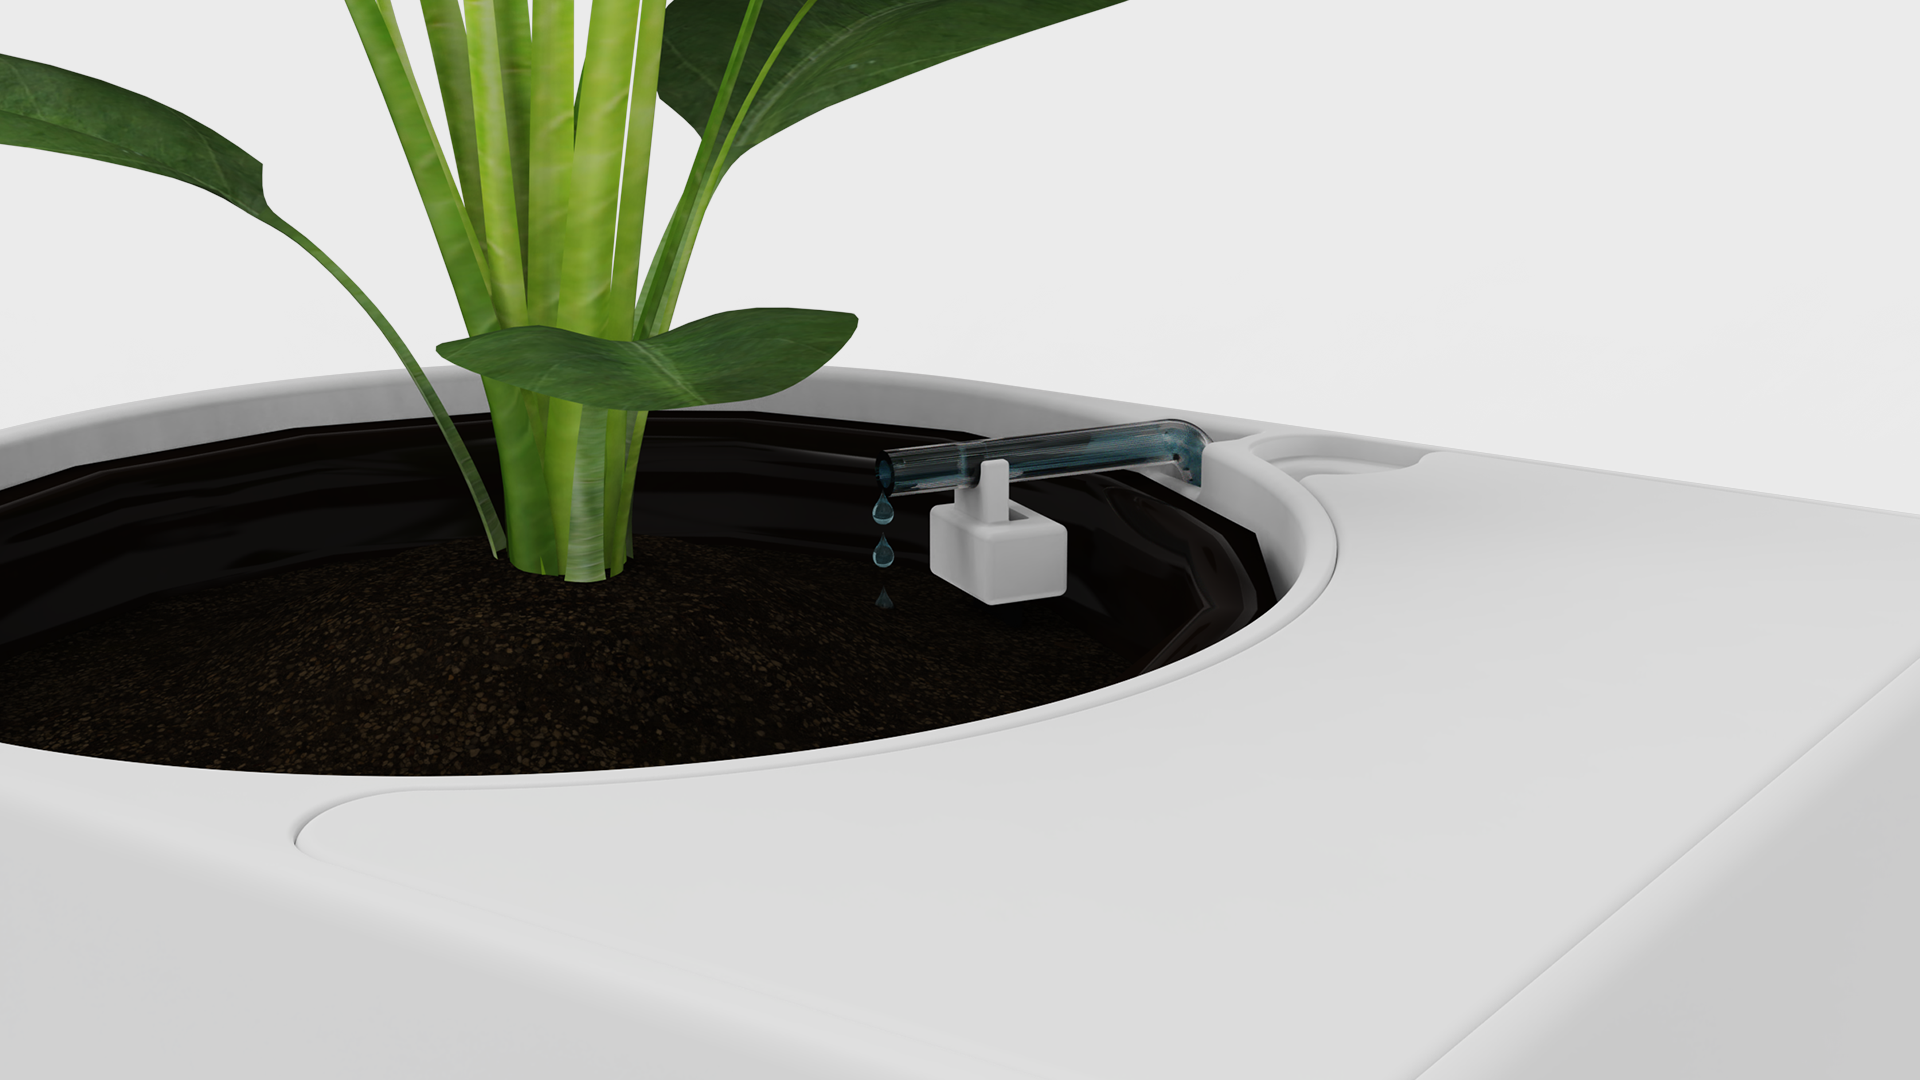
Pump and hoses
The pump included in the pot has a compartment on the underside where it is connected to two hoses, one goes to the water and one goes to the plant. The hoses are pressed onto the pump nozzles to keep tight. A seal sits between the pot and the hose that goes to the water to minimize leakage.

Packaging
Consideration was given to design options to create a package that is both functional, aesthetically pleasing and suitable for the pot. By creating packaging that protects the product during transport, is easy to open and use, costly returns and customer complaints can be avoided for our case company. A product logo has also been created to create interest in the customer and create recognition. During this project I have not been involved in designing the logo but focused on everything else.

Unique features
Now everyone who doesn't have the time or energy to take care of their plants can get an opportunity to take care of their plants in a simple way with the help of Flower Guard. It has been solved by designing a pot that, with the help of a capacitive sensor, large water tank, pump and microcontroller, is adapted to the plant's water needs. Since the sensor determines when the pump should water the plant, the user only needs to perform minimal maintenance in the form of water refilling approximately every six weeks, as the tank holds one liter and an average plant needs approximately 1.5 dl per week. The plant will also feel much better because it will not have to live in constant moisture as it does with today's system. To ensure that the pot is aesthetically pleasing, the users have had to give criticism on the appearance of the pot, which has been overwhelmingly positive.
Areas of improvement
In order for Flower Guard to be manufactured as planned, release angles need to be added so that it can be injection molded correctly. The cap must be adjusted to not be too tight and have enough clearance. Pump and hoses need to be ordered to be able to make exact adjustments to the pot. Microcontrollers with sensors are something that needs to be tested and adjusted to ensure that the volume of water being pumped out is correct. Tests need to be done to see exactly which capacitance values should be set on the microcontroller.
Lessons Learnt
For the next time we do a similar project, we will check earlier which manufacturing methods are available, mainly to avoid having to redo the concept at a late stage. We have also learned that it is good to make very simple prototypes early on, in order to form an idea of how the concept is supposed to work and its dimensions.
Justifying one's own design choices before a presentation to the group has taught us that it is important to be able to strengthen one's choices and have an opportunity to influence the final result. Another lesson learned is that it is important to connect back to the target group after certain design choices. Sometimes the group's own opinions and insights can greatly influence the result, and connecting to the users' opinions and experiences of what they have done can really benefit the project and ensure that you are heading in the right direction or should rethink.
Final picture where everyone is holding the pot and smiles